Building a Production-Ready Azure Lighthouse Deployment Pipeline with EPAC

Introduction
In MSP environments, Azure Lighthouse is usually one of those solutions that looks straightforward on paper but becomes much harder once you try to run it in a clean, repeatable, production-ready way. In smaller environments, many teams still deploy Lighthouse manually through the Azure portal, and subscription by subscription. That may be acceptable for a quick onboarding or a lab scenario, but it becomes difficult to govern when the number of customers, management groups, subscriptions, and delegated roles starts to grow. The following operational problems usually appear very quickly:
- Managed identities may lack the remediation roles needed for deployIfNotExists to complete successfully.
- RBAC inheritance behavior can also cause unexpected assignment failures.
- Manual deployment creates drift between subscriptions.
- Policy-based onboarding is difficult to troubleshoot.
- RBAC assignments that seem correct can still fail due to role assignment conditions.

In many cases, engineers solve these issues by simply granting excessive permissions to the automation account, which makes the deployment work but weakens the overall security model.
This is exactly the kind of problem Enterprise Policy as Code (EPAC) can help reduce. EPAC gives you a structured way to define Azure Lighthouse onboarding through policy, keep the management group as the authoritative scope, separate planning from deployment and RBAC operations, and make the whole process more repeatable and auditable.
In this article, I will walk through how to use EPAC and Azure DevOps to deploy Azure Lighthouse from management group scope in a production-oriented way, while keeping least privilege, remediation behavior, and RBAC dependencies under control.
ToC
- Introduction
- Architecture Overview
- MSP-side Entra Preparation
- Designing role assignments based on team requirements
- Translate the role-assignment design into an EPAC policy assignment
- Customer Preparation
- Right management group for delegated subscriptions
- Verify the must have resource providers
- Register resource providers via an all-in-one script
- Required Entra applications on the customer tenant
- Grant proper roles to each application
- Connecting Azure DevOps to the customer tenant via service connection
- Securing authentication via workload identity federation
- Understand pipeline wiring and files in Azure DevOps
- Repository files you must understand
- Understanding the pipeline structure
- Onboarding a new customer via the pipeline
- Bind the customer service connections to the pipeline
- Onboard a Lighthouse customer using EPAC environment
- Running the pipeline and use Lighthouse
- Assigning the test user to the security groups
- Verifying the Lighthouse implementation and available eligible roles
- Conclusion
Architecture Overview
The overall design is centered around the customer management group, which acts as the authoritative deployment scope for the Azure Lighthouse policy assignment.
Instead of creating separate policy assignments for each subscription, the solution assigns the custom Deploy-AzureLighthouse policy once at management-group level. All child subscriptions under that management group then inherit the assignment automatically.
The architecture has three working layers. First, the EPAC repository stores the desired state, including global settings, the Lighthouse policy definition, and the management-group policy assignment. Second, Azure DevOps builds and deploys the EPAC plans by separating policy deployment and RBAC deployment into dedicated stages and service connections. Third, the operational scripts perform Lighthouse sanity checks, optional reset actions, and remediation so that inherited subscriptions converge to the expected state.
Although the governance scope is the management group, the actual Azure Lighthouse registration resources are still deployed inside each child subscription. That is why the pipeline remains management-group driven while still inspecting and operating on subscriptions underneath that scope.
MSP-side Entra Preparation
Before we touch the customer tenant, the MSP side must already have the Microsoft Entra groups and principals that will receive delegated access through Azure Lighthouse. In practice, this is where the operating model starts. Azure Lighthouse is not only about onboarding subscriptions. It is also about deciding which operational teams in the MSP should receive which permissions in the customer environment.
Designing role assignments based on team requirements
I recommend creating a table like the one shown below. Based on the roles and permissions required by colleagues across different departments, use this table to plan the necessary role assignments:
Here is what each column represent:
- Entra ID Group: This represents the names of the security groups you need to create in the MSP Microsoft Entra ID. It serves as an identifier, so it is best to choose a name that clearly reflects the group's purpose.
- Roles and Role-ID: The last two columns define the actual Azure roles that will be assigned to each MSP Entra ID security group. Any user added to one of these groups inherits the permissions linked to that group. The Detailed Roles & Permissions column should contain the official Microsoft role names, while the Role ID column should contain the matching role definition IDs. These values should always be taken from Microsoft's actual built-in role definitions, not entered manually. You can find them in the Azure portal (IAM) or by using Azure CLI to look up the role name and its corresponding ID. This ensures your table uses the correct role names and identifiers for each assignment.

In my setup, the MSP tenant contains dedicated Entra security groups for different operational functions such as Reader, Servicedesk, Security Reader, etc. I created nine security groups already referenced in the table as follows:

These groups primarily serve as identifiers. Keep in mind that the critical part of this setup is ensuring these groups are correctly mapped to the appropriate write roles, which are later referenced in the Azure Lighthouse policy assignment parameters, so they effectively become the identities that receive delegated access when the deployment is remediated.
This separation is important for two reasons. First, it keeps delegated access aligned to real operational responsibilities instead of giving a single broad role to everyone. Second, it makes future onboarding easier because new customer subscriptions can inherit the same delegated model without redesigning the RBAC structure each time.
Translate the role-assignment design into an EPAC policy assignment
I explain the pipeline wiring and file structure in detail in Section 6 of this article, and you can find the project files in the Git repository.
For now, the next step is to generate the content of Deploy-AzureLighthouse.jsonc that translates the design above into a pipeline-readable configuration located under Definitions\policyAssignments.
Deploy-AzureLighthouse.jsonc translates our company's operating model and team-based access design into an EPAC policy assignment that deploys Azure Lighthouse delegation in the customer tenant.
Let's analyze how Deploy-AzureLighthouse.jsonc helps us to relate the Entra ID security groups we created here and the actual role IDs extracted from Microsoft's actual built-in role definitions:

The principalId value, highlighted in yellow, represents the object ID of the Network Contributor group you created in the MSP Microsoft Entra ID tenant, while roleDefinitionId represents the corresponding built-in Azure role definition ID you extracted earlier.
Customer Preparation
On the customer side, the preparation work is split between Microsoft Entra ID and Azure Resource Manager. From the Entra perspective, we need application identities that the EPAC pipeline can use. From the Azure side, we need a clean management group structure so that Azure Policy can be assigned once at the correct governance boundary.
Right management group for delegated subscriptions
The first Azure-side task is to create a dedicated management group for the subscriptions that will be governed by the MSP. In this article, I use a management group MSP-Delegated for that purpose. After creating it, all subscriptions that should receive Azure Lighthouse onboarding are moved under that management group. This step is critical because the EPAC design in this project is management-group driven. The policy assignment is created once at management-group level, and the child subscriptions inherit the assignment automatically.
Verify the must have resource providers
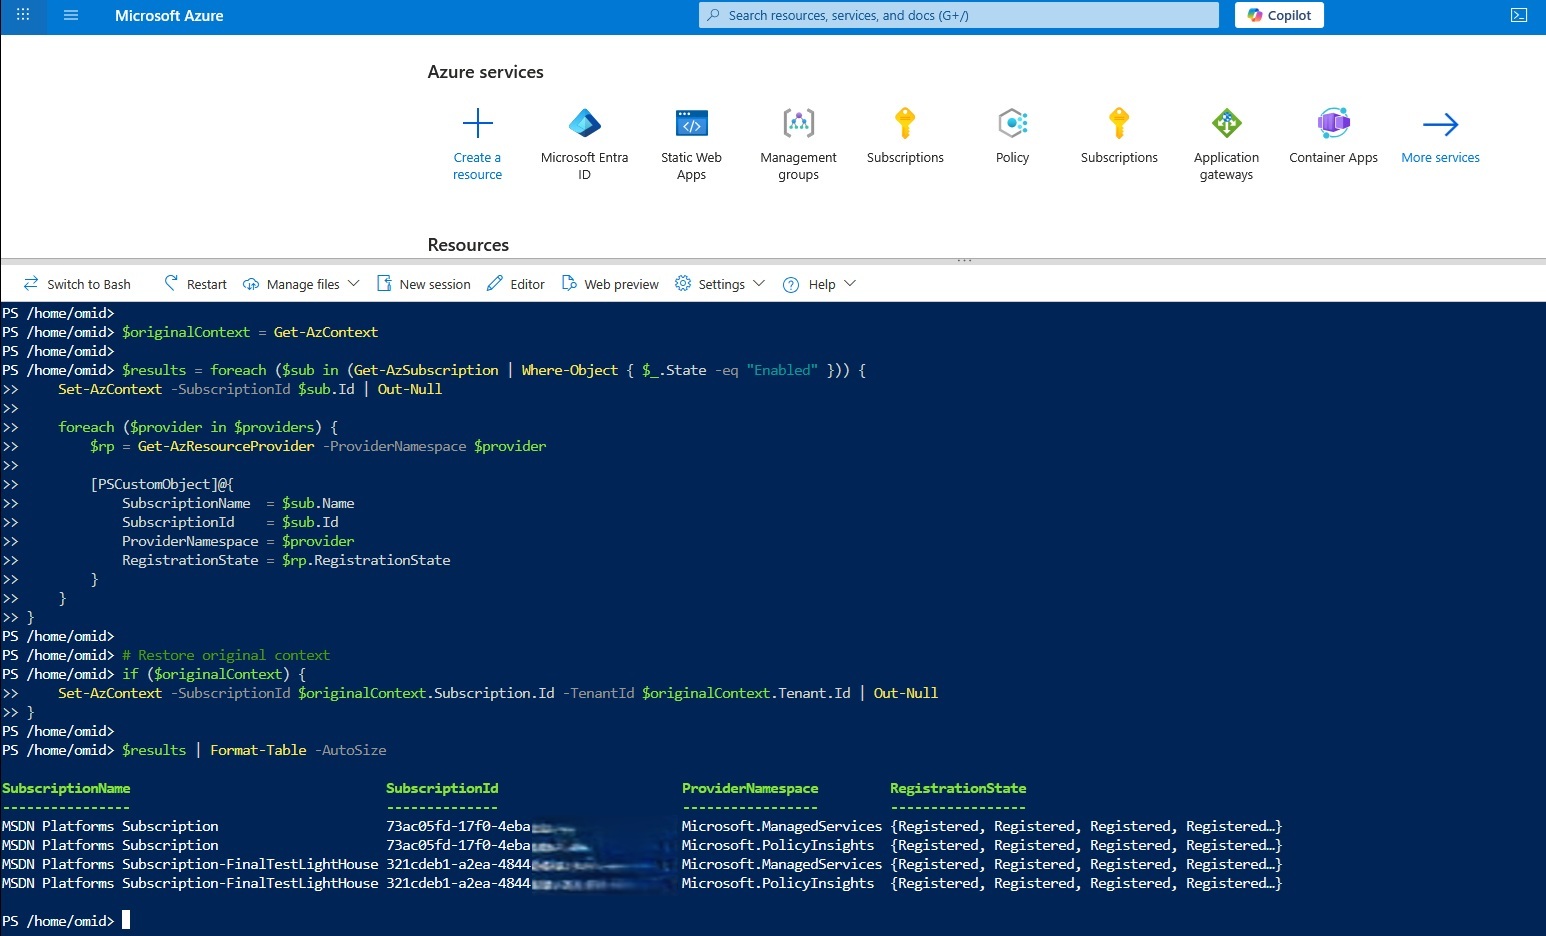
To enable Azure delegated resource management through Azure Lighthouse and maintain consistent policy visibility, organizations typically need both Microsoft.ManagedServices and Microsoft.PolicyInsights registered at the relevant scopes. Microsoft.ManagedServices underpins Azure Lighthouse-style delegation, which lets a managing tenant administer customer subscriptions and resource groups, while Microsoft.PolicyInsights supports Azure Policy insights and compliance workflows. Because provider registration at management-group scope does not automatically cascade to child subscriptions, both the management-group layer and the underlying subscriptions must be handled explicitly. You can run the script as shown below to check whether your customer subscriptions already include both Microsoft.ManagedServices and Microsoft.PolicyInsights:
$providers = @(
              "Microsoft.ManagedServices",
              "Microsoft.PolicyInsights"
          )

          $originalContext = Get-AzContext

          $results = foreach ($sub in (Get-AzSubscription | Where-Object { $_.State -eq "Enabled" })) {
              Set-AzContext -SubscriptionId $sub.Id | Out-Null

              foreach ($provider in $providers) {
                  $rp = Get-AzResourceProvider -ProviderNamespace $provider

                  [PSCustomObject]@{
                      SubscriptionName  = $sub.Name
                      SubscriptionId    = $sub.Id
                      ProviderNamespace = $provider
                      RegistrationState = $rp.RegistrationState
                  }
              }
          }

          # Restore original context
          if ($originalContext) {
              Set-AzContext -SubscriptionId $originalContext.Subscription.Id -TenantId $originalContext.Tenant.Id | Out-Null
          }

          $results | Format-Table -AutoSize
The result should be as follows:
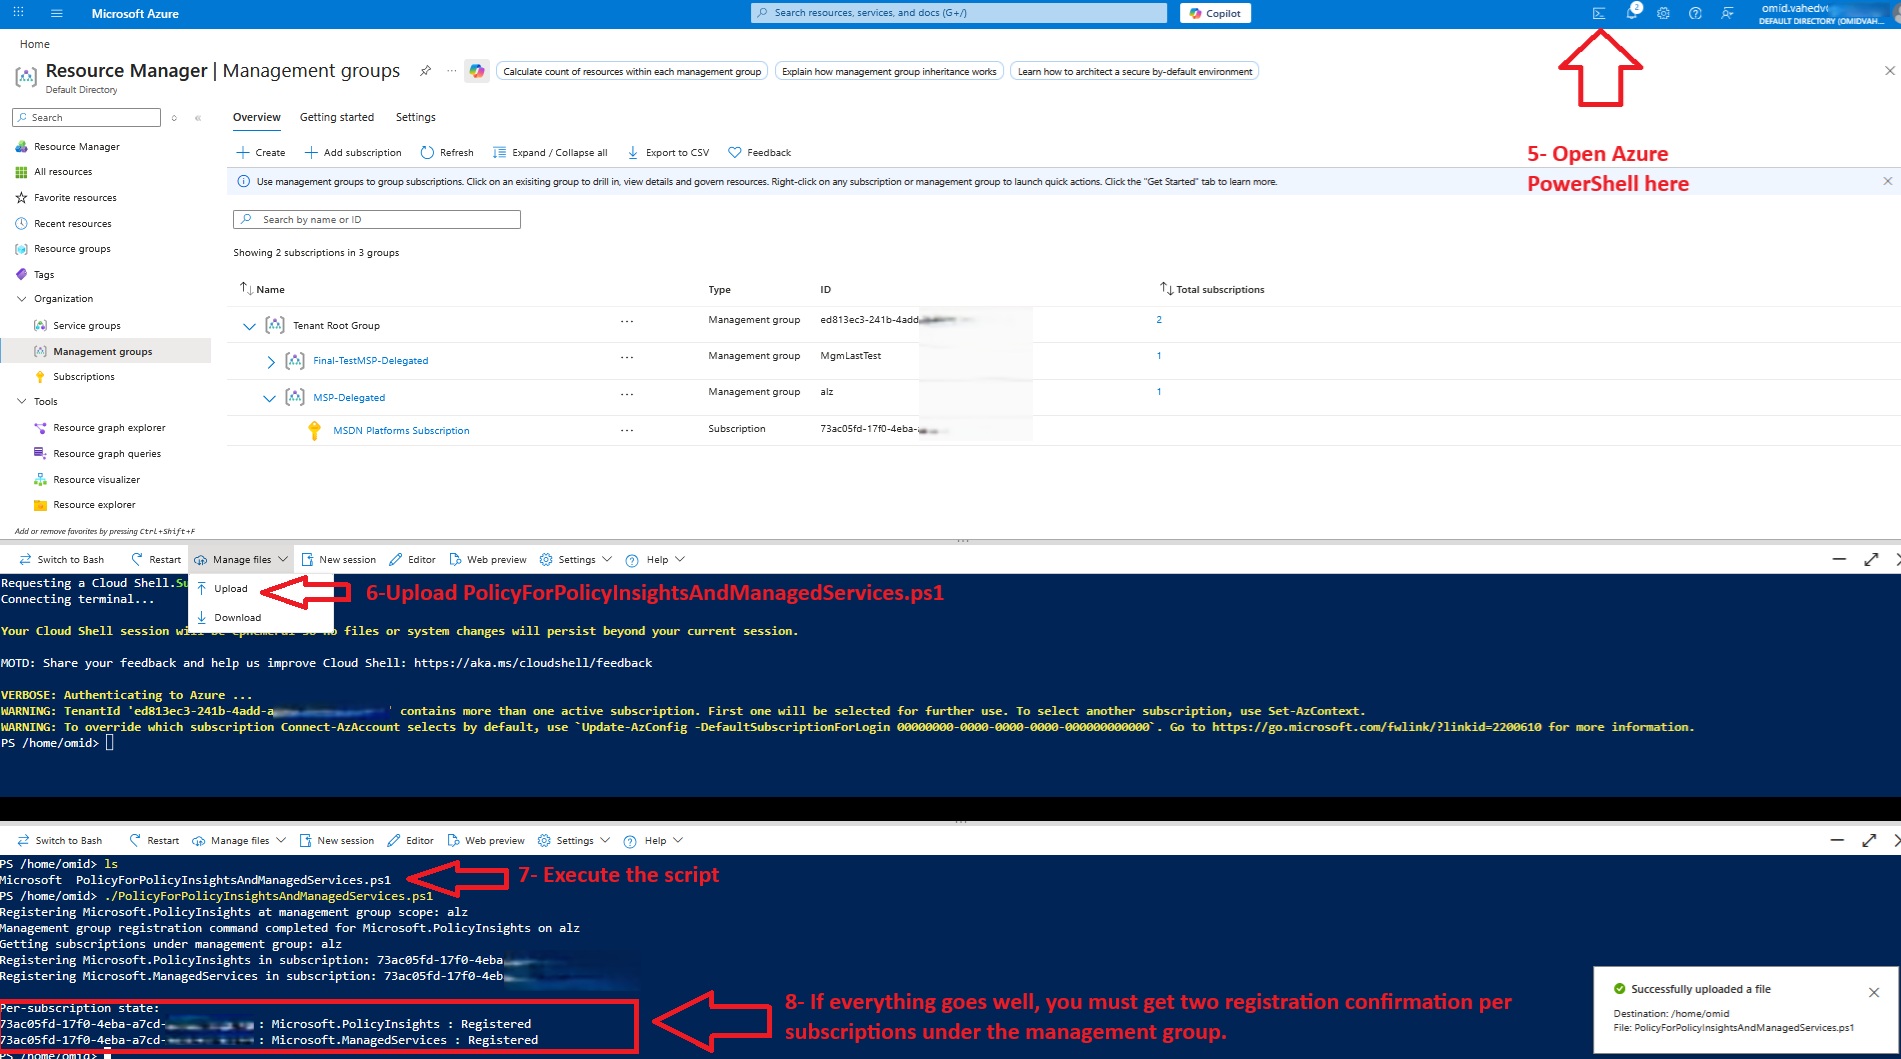
If neither provider is registered, you can use the script I prepared to register both providers recursively across the management group, its child subscriptions, and its child management groups.
Register resource providers via an all-in-one script
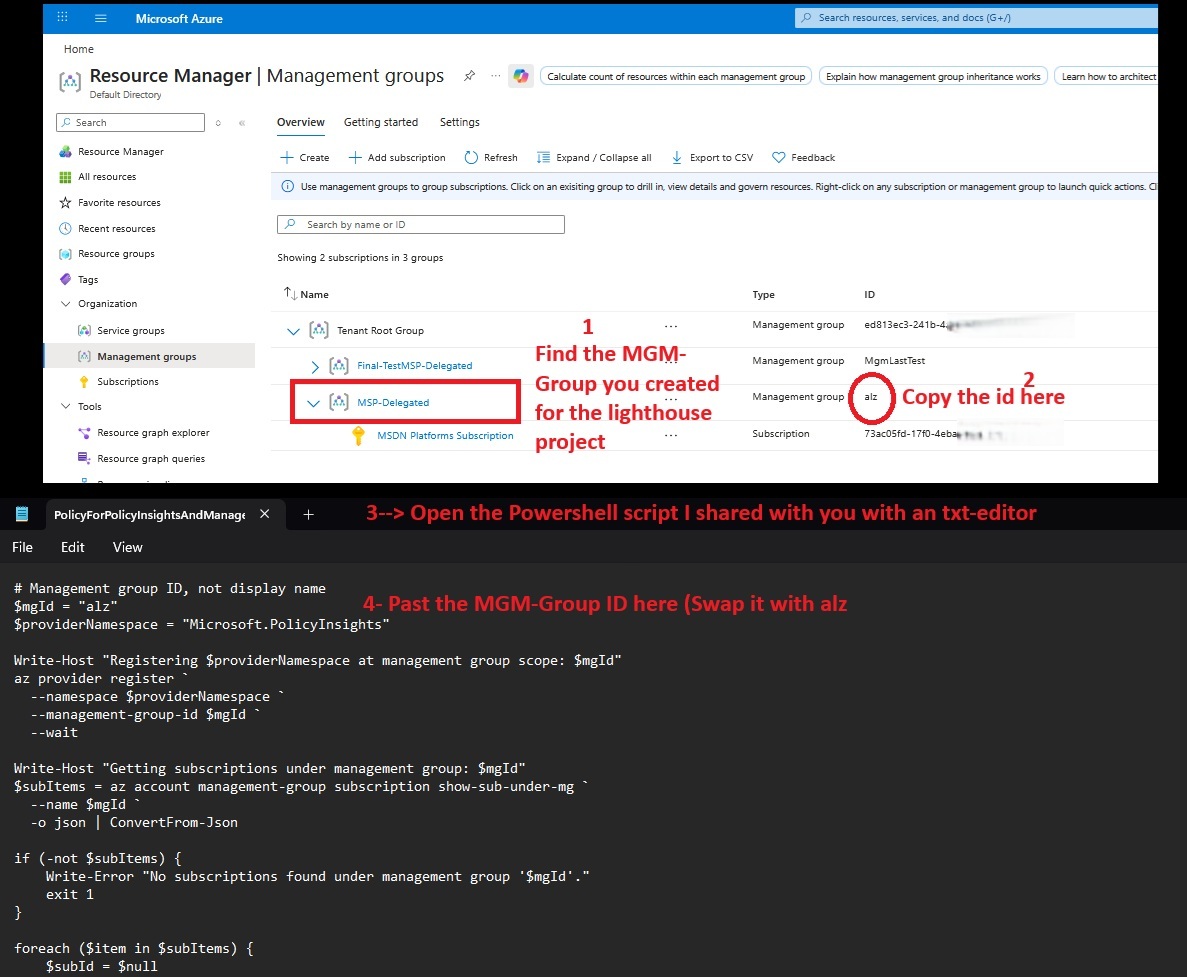
The following script streamlines that process by starting from the management group you created for the delegated subscriptions, discovering its child management groups and subscriptions, attempting the required provider registration at management-group scope, and then registering both providers across every discovered subscription:
Tip: Paste the script into a notepad file and save it with .ps1 extension.
$rootMgId = "alz"

          $providers = @(
              "Microsoft.PolicyInsights",
              "Microsoft.ManagedServices"
          )

          function Get-MgTree {
              param(
                  [Parameter(Mandatory = $true)]
                  [string]$ManagementGroupId
              )

              az account management-group show `
                  --name $ManagementGroupId `
                  --expand `
                  --recurse `
                  -o json | ConvertFrom-Json
          }

          function Collect-MgAndSubscriptionIds {
              param(
                  [Parameter(Mandatory = $true)]
                  $Node,

                  [Parameter(Mandatory = $true)]
                  [ref]$ManagementGroups,

                  [Parameter(Mandatory = $true)]
                  [ref]$Subscriptions
              )

              if (-not $Node) {
                  return
              }

              # Current management group
              if ($Node.name) {
                  [void]$ManagementGroups.Value.Add($Node.name)
              }

              # Child collection is usually under properties.children
              $children = $null
              if ($Node.properties -and $Node.properties.children) {
                  $children = $Node.properties.children
              }
              elseif ($Node.children) {
                  $children = $Node.children
              }

              if (-not $children) {
                  return
              }

              foreach ($child in $children) {
                  $childType = $null
                  if ($child.type) {
                      $childType = $child.type
                  }
                  elseif ($child.properties -and $child.properties.type) {
                      $childType = $child.properties.type
                  }
                  elseif ($child.childType) {
                      $childType = $child.childType
                  }

                  $childName = $null
                  if ($child.name) {
                      $childName = $child.name
                  }
                  elseif ($child.properties -and $child.properties.name) {
                      $childName = $child.properties.name
                  }

                  $childId = $null
                  if ($child.id) {
                      $childId = $child.id
                  }
                  elseif ($child.properties -and $child.properties.id) {
                      $childId = $child.properties.id
                  }

                  $isSubscription = $false
                  $isManagementGroup = $false

                  if ($childType -match "subscription" -or $childId -match "/subscriptions/") {
                      $isSubscription = $true
                  }
                  elseif ($childType -match "managementgroup" -or $childId -match "/managementGroups/") {
                      $isManagementGroup = $true
                  }

                  if ($isSubscription) {
                      $subId = $null

                      if ($childName -match '^[0-9a-fA-F-]{36}$') {
                          $subId = $childName
                      }
                      elseif ($childId -match "/subscriptions/([^/]+)$") {
                          $subId = $matches[1]
                      }

                      if ($subId) {
                          [void]$Subscriptions.Value.Add($subId)
                      }
                      else {
                          Write-Warning "Could not determine subscription ID from child: $($child | ConvertTo-Json -Depth 20 -Compress)"
                      }
                  }
                  elseif ($isManagementGroup) {
                      Collect-MgAndSubscriptionIds -Node $child -ManagementGroups $ManagementGroups -Subscriptions $Subscriptions
                  }
              }
          }

          Write-Host "Loading management group hierarchy from root: $rootMgId"
          $tree = Get-MgTree -ManagementGroupId $rootMgId

          $mgSet = New-Object 'System.Collections.Generic.HashSet[string]'
          $subSet = New-Object 'System.Collections.Generic.HashSet[string]'

          Collect-MgAndSubscriptionIds -Node $tree -ManagementGroups ([ref]$mgSet) -Subscriptions ([ref]$subSet)

          if ($mgSet.Count -eq 0) {
              Write-Error "No management groups discovered under root '$rootMgId'."
              exit 1
          }

          Write-Host ""
          Write-Host "Management groups discovered:"
          $mgSet | Sort-Object | ForEach-Object { Write-Host "- $_" }

          Write-Host ""
          Write-Host "Subscriptions discovered:"
          $subSet | Sort-Object | ForEach-Object { Write-Host "- $_" }

          # 1) Attempt registration at management-group scope for every MG in the hierarchy
          Write-Host ""
          Write-Host "Registering providers at management-group scope..."
          foreach ($mgId in ($mgSet | Sort-Object)) {
              foreach ($providerNamespace in $providers) {
                  Write-Host "Registering $providerNamespace on management group: $mgId"
                  az provider register `
                      --namespace $providerNamespace `
                      --management-group-id $mgId `
                      --wait

                  if ($LASTEXITCODE -ne 0) {
                      Write-Warning "Management-group registration failed for $providerNamespace on $mgId. Continuing."
                  }
              }
          }

          # 2) Register in every subscription under the hierarchy
          Write-Host ""
          Write-Host "Registering providers in subscriptions..."
          foreach ($subId in ($subSet | Sort-Object)) {
              foreach ($providerNamespace in $providers) {
                  Write-Host "Registering $providerNamespace in subscription: $subId"
                  az provider register `
                      --namespace $providerNamespace `
                      --subscription $subId `
                      --wait

                  if ($LASTEXITCODE -ne 0) {
                      Write-Warning "Subscription registration failed for $providerNamespace in $subId"
                  }
              }
          }

          # 3) Verify subscription registrations
          Write-Host ""
          Write-Host "Per-subscription registration state:"
          foreach ($subId in ($subSet | Sort-Object)) {
              foreach ($providerNamespace in $providers) {
                  $state = az provider show `
                      --namespace $providerNamespace `
                      --subscription $subId `
                      --query registrationState `
                      -o tsv

                  Write-Host "$subId : $providerNamespace : $state"
              }
          }
Once you have prepared your PowerShell script and replaced the management group ID with your own management group ID, you can then run it against the customer tenant environment as shown below:
Required Entra applications on the customer tenant
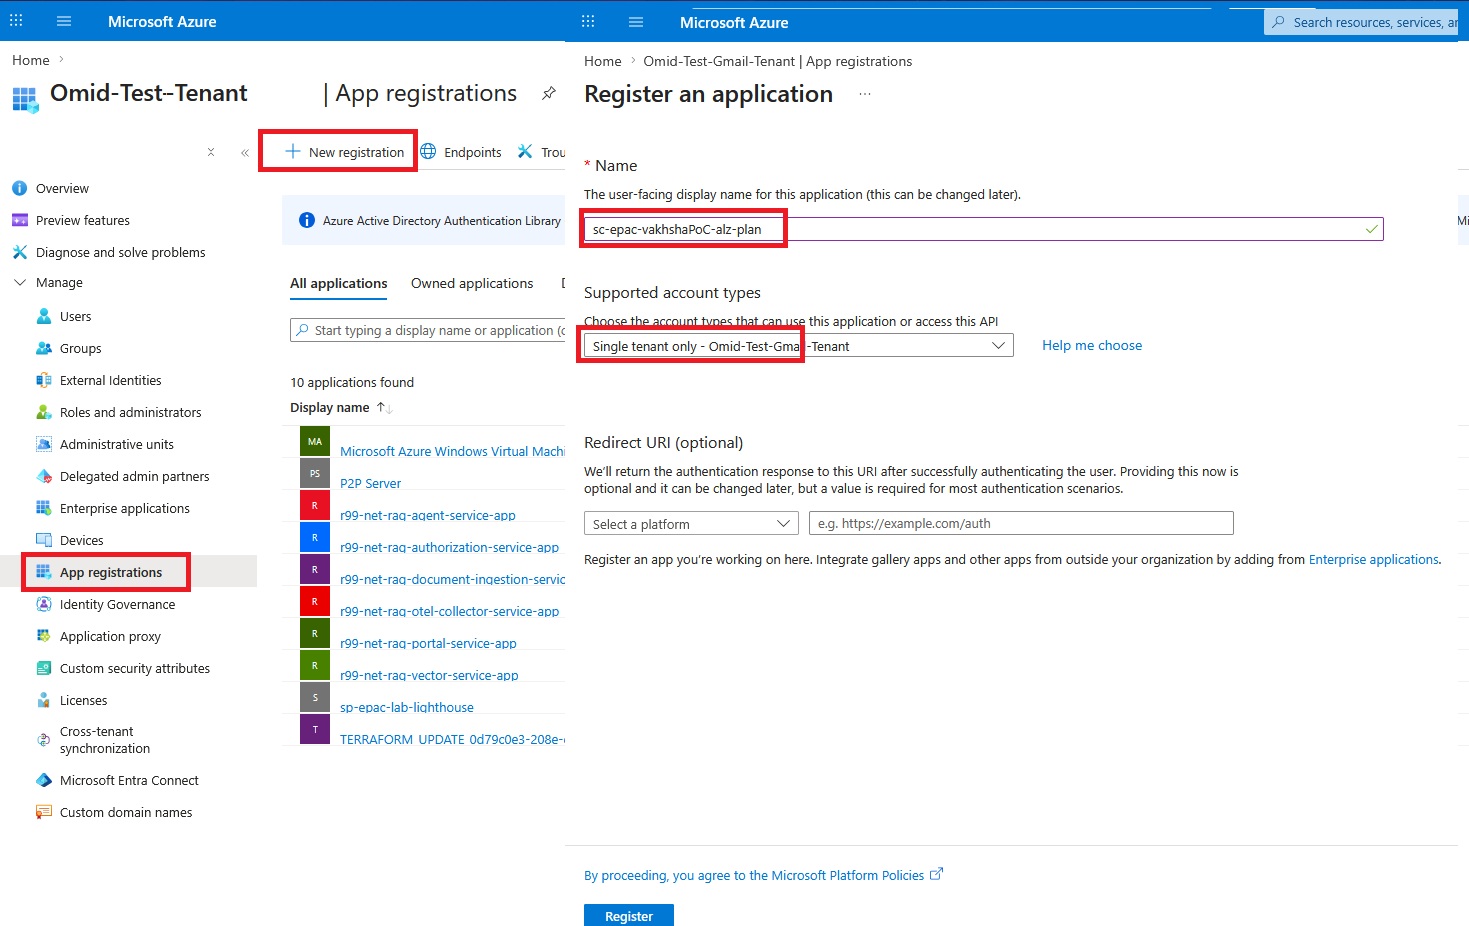
To follow the least privilege approach for each application, I create three separate Microsoft Entra applications in the customer tenant and we will map each one to its own Azure DevOps service connection.
The three applications are:
- sc-epac-vakhshaPoC-alz-plan
- sc-epac-vakhshaPoC-alz-policy
- sc-epac-vakhshaPoC-alz-roles
This split is important because each stage in the pipeline has a different security requirement.
The planning stage only needs read access.
The policy deployment stage needs permission to manage Azure Policy resources.
The role deployment stage is the only stage that should be allowed to write RBAC assignments.
This keeps the overall design closer to least privilege and avoids the common problem of giving one automation identity permanent high-level access to everything.
Repeat the same process for sc-epac-vakhshaPoC-alz-policy and sc-epac-vakhshaPoC-alz-roles:

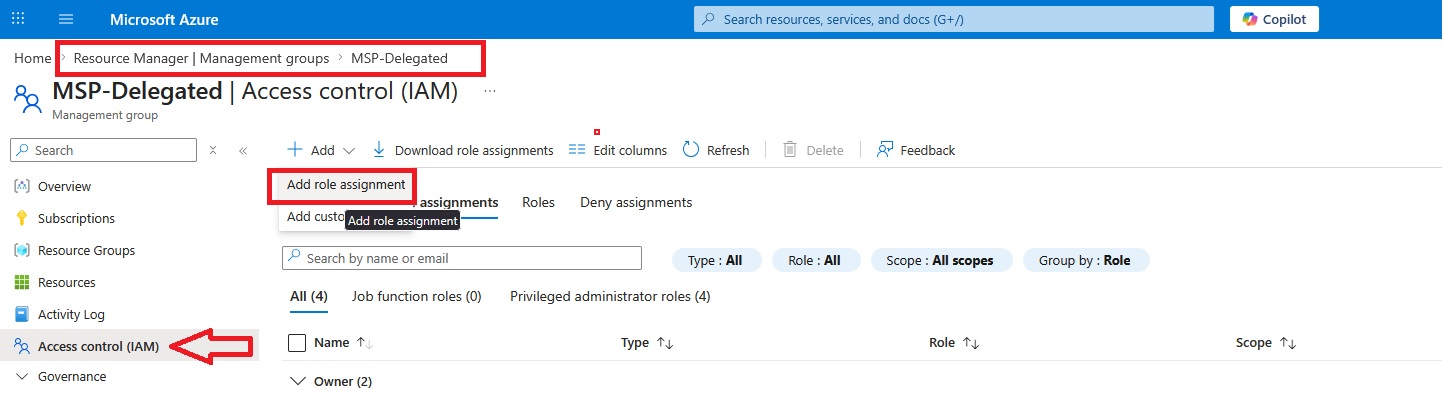
Grant proper roles to each application
Once the three applications are created, each one must be granted the correct role at the customer deployment management group. Based on the EPAC design used in this project, the role mapping is as follows:
- sc-epac-vakhshaPoC-alz-plan
Role: Reader
- sc-epac-vakhshaPoC-alz-policy
Role: Resource Policy Contributor
- sc-epac-vakhshaPoC-alz-roles
Role: Role Based Access Control Administrator
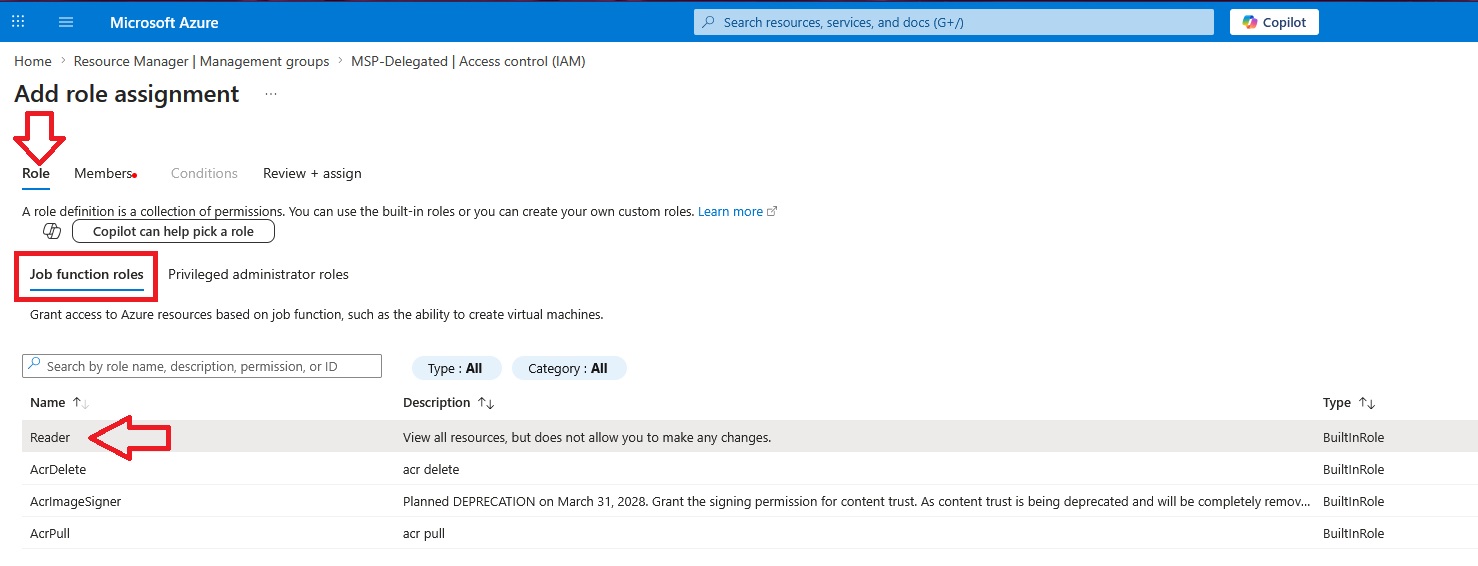
While the steps for sc-epac-vakhshaPoC-alz-policy are identical, the sc-epac-vakhshaPoC-alz-roles connection requires higher permissions. Because this service connection must manage RBAC assignments, including privileged roles like User Access Administrator, you must select "Allow user to assign all roles (highly privileged)" during setup:

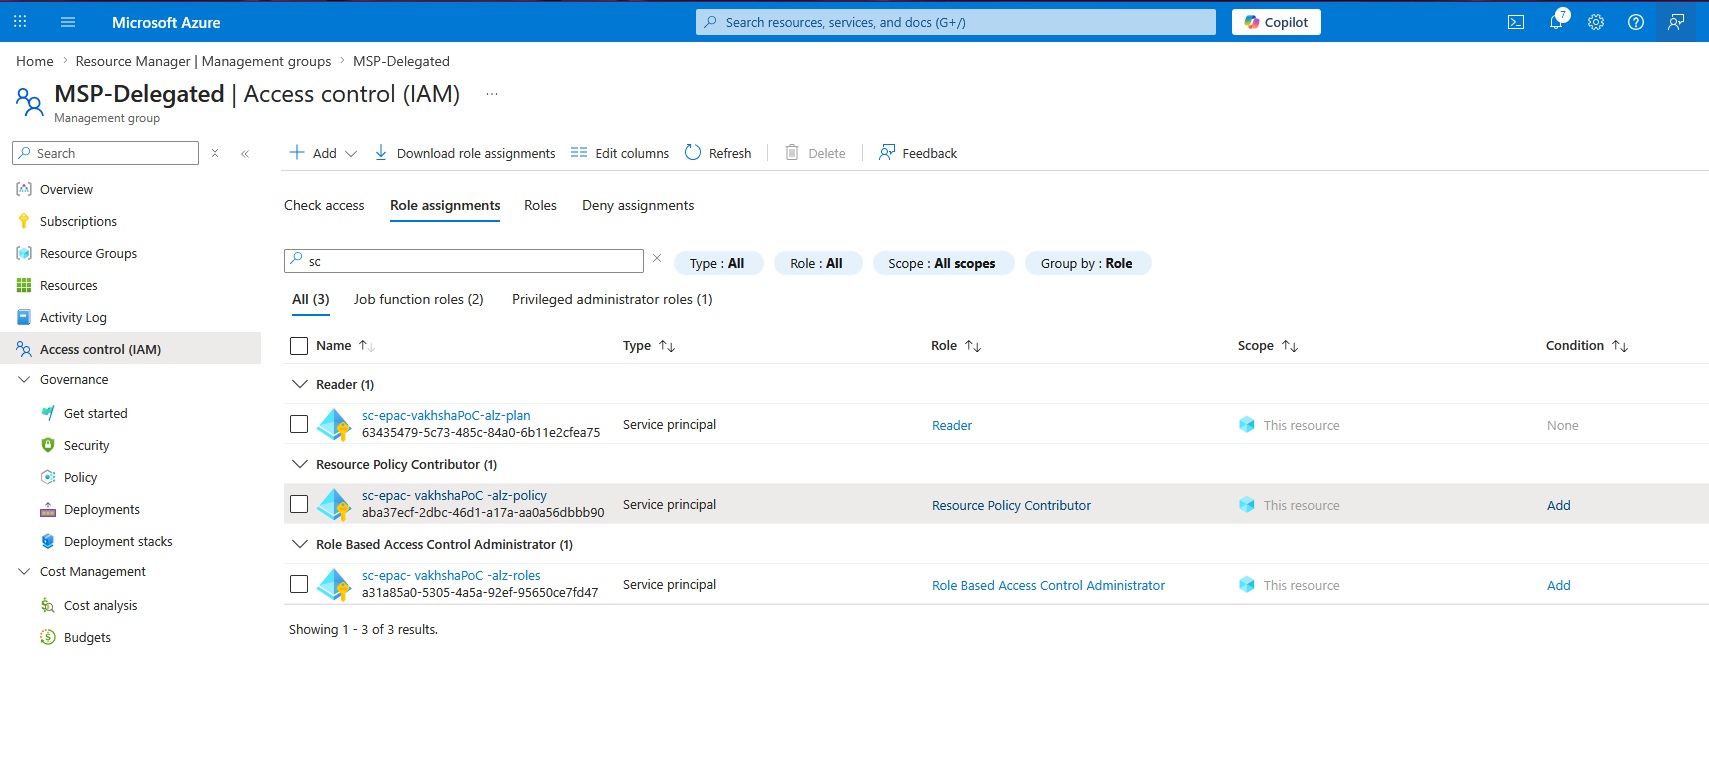
Eventually the role assignments section for the management groups should look like as shown below:

In the next step, we need to create a service connection to securely connect the MSP Azure DevOps environment to the customer management group.
To create the service connections for each application we created above, you need to note the Application (Client) ID for each application, as well as the Directory (Tenant) ID:
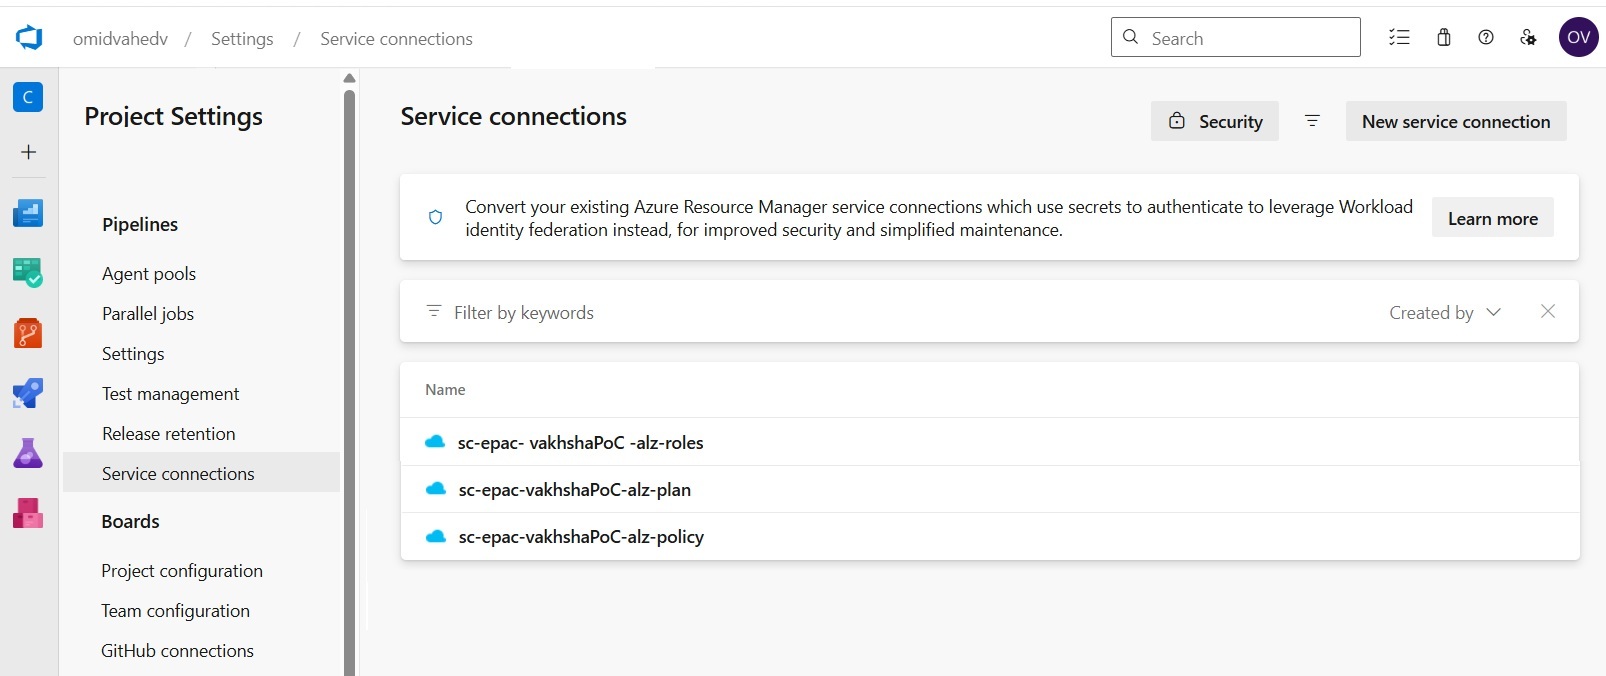
Connecting Azure DevOps to the customer tenant via service connection
Once the applications and role assignments are ready, the next step is to create one Azure DevOps service connection for each application. These service connections are then referenced directly in the EPAC pipeline.
First, go to Dev.azure.com and open the correct project where you want to create the pipeline. Then click Project settings.
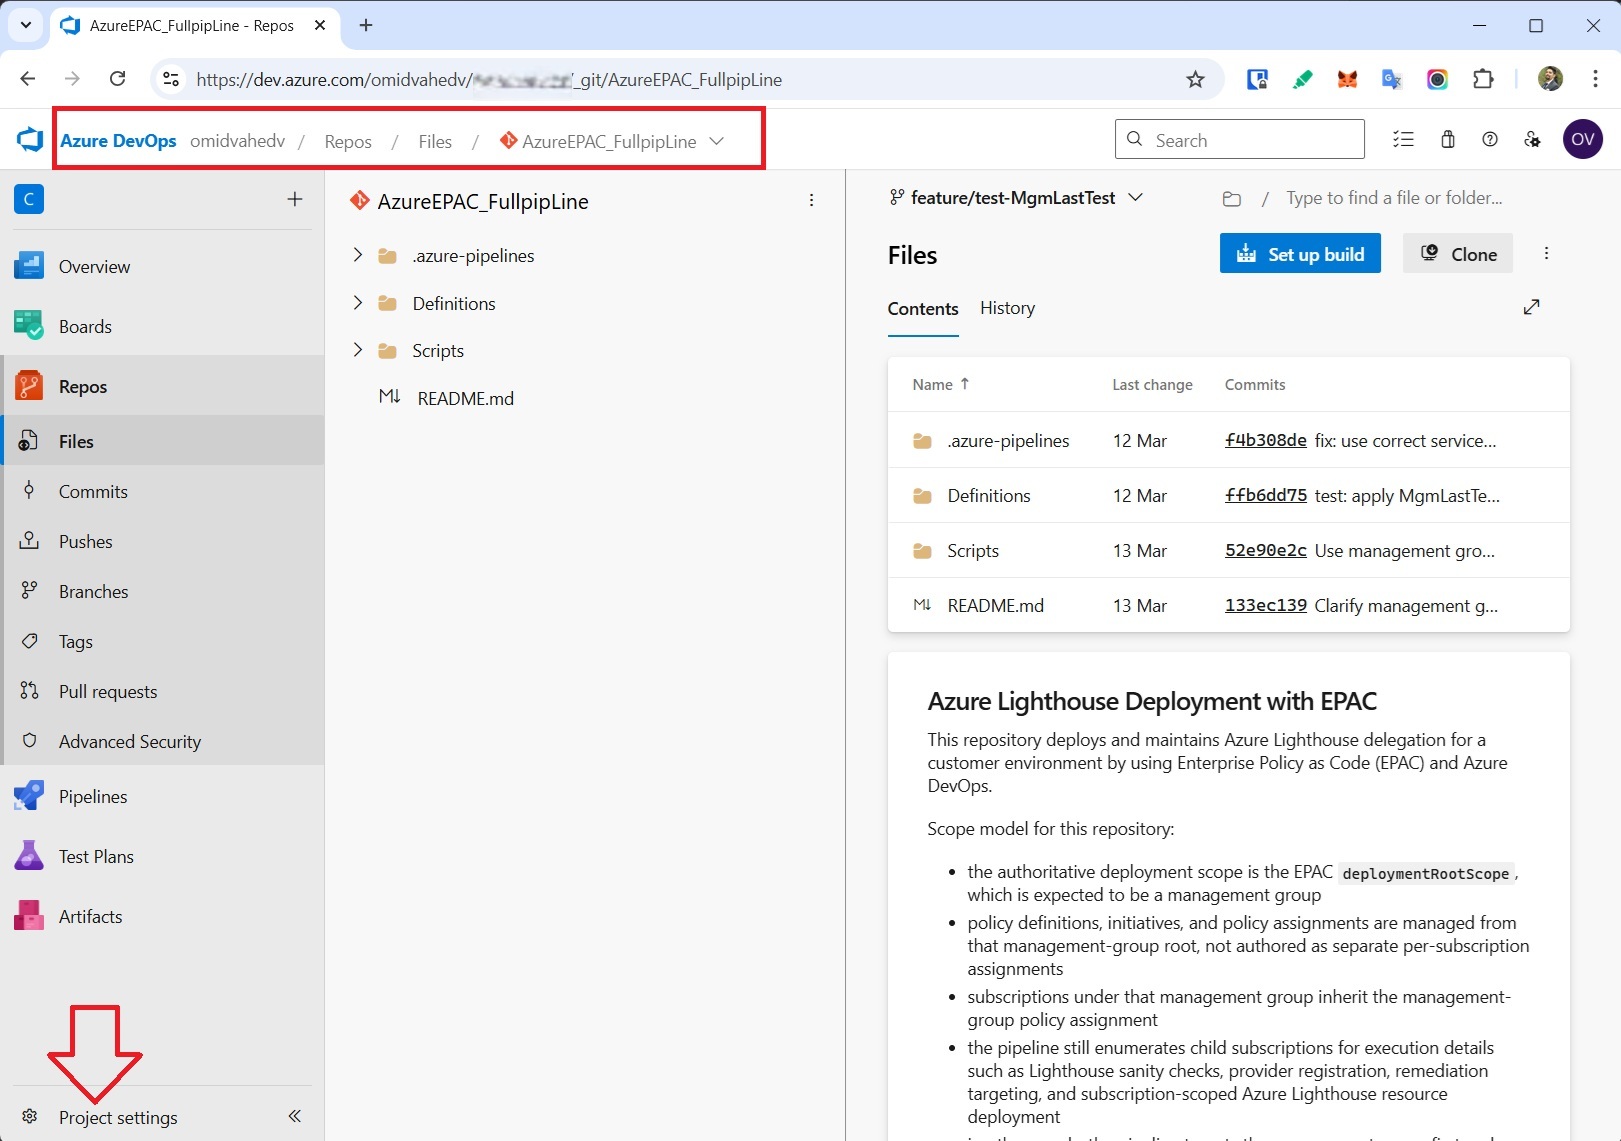
Here we can create the service connections:

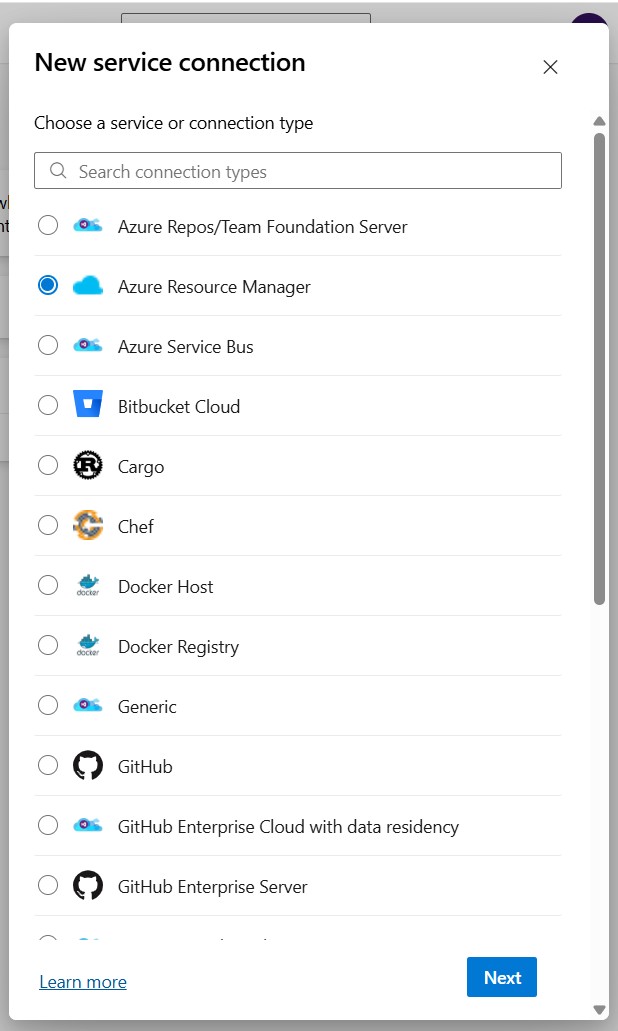
You see different service connection types because Azure DevOps uses service connections as authenticated links to different external systems. Each type is purpose-built for a specific target, such as Azure, GitHub, Bitbucket, Docker registries, Kubernetes, or Azure Repos.
Securing authentication via workload identity federation
In this scenario, you select Azure Resource Manager because the pipeline needs to authenticate to Azure resources such as a subscription or management group and then perform deployment or configuration actions there. Microsoft's Azure DevOps guidance specifically uses Azure Resource Manager for connecting a pipeline to Azure.
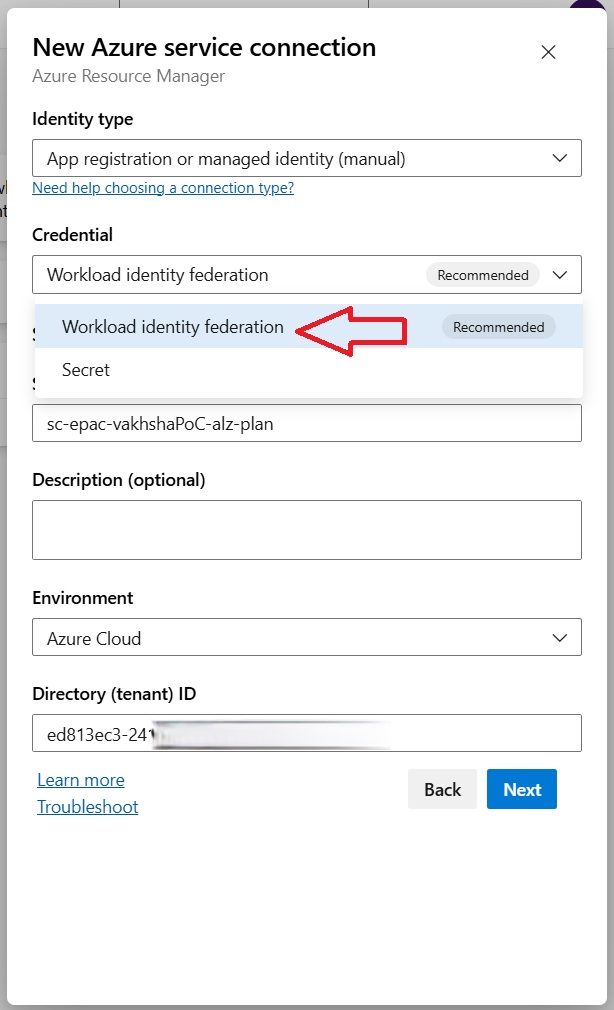
For this service connection, Workload identity federation is the preferred option because it lets Azure DevOps authenticate to Azure without storing a client secret. Instead, Azure DevOps uses a trust relationship with Microsoft Entra ID and exchanges a trusted token for an access token at runtime. On the other hand, using a secret means the pipeline depends on a long-lived credential that must be stored securely and monitored for expiry.

Before proceeding with Verify and save, we must add a Federated credential in the configuration section of each application we created in the customer Entra ID.
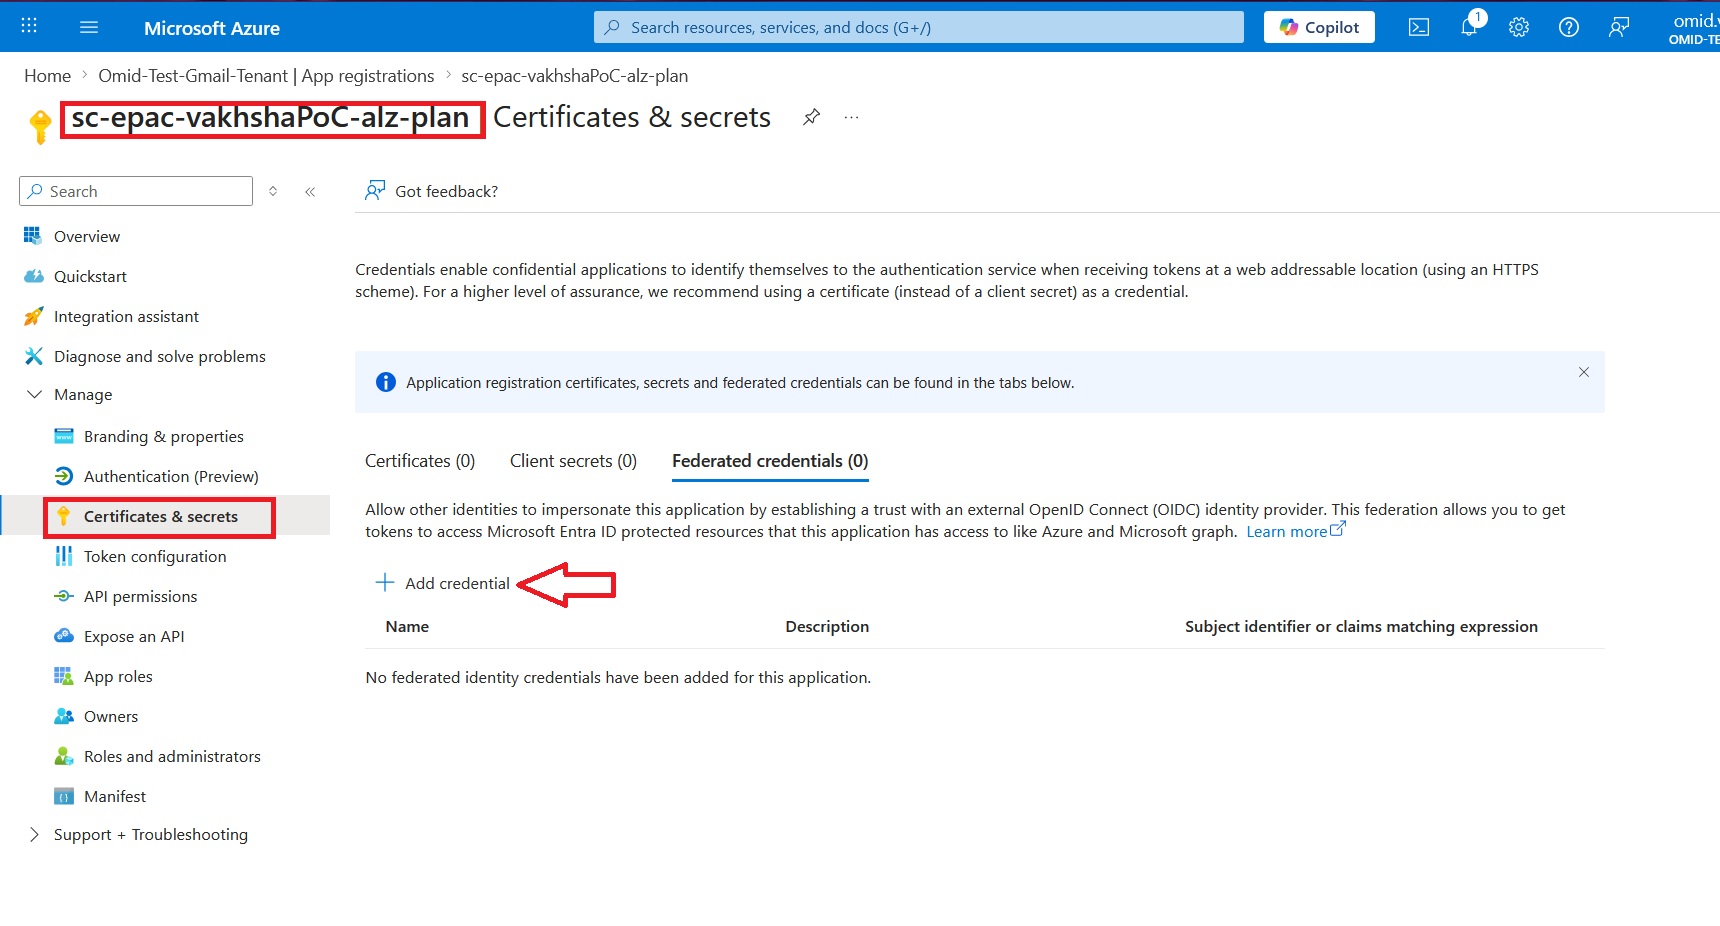
Next, copy the Issuer and Subject identifier from the Azure DevOps service connection and paste the Issuer into the Issuer field, and paste the Subject identifier into the Value field with Explicit subject identifier selected. These values must match exactly for the trust configuration to work correctly.

The exact same steps applied to sc-epac-vakhshaPoC-alz-policy and sc-epac-vakhshaPoC-alz-roles. The defined service connections should be as shown below:
Once the Microsoft Entra ID preparation is complete on both the customer and MSP sides, and the required applications and service connections have been created, the next step is to prepare the pipeline files.
At this stage, the preparation phase is complete. The customer environment now has:
- the correct management group boundary
- the subscriptions placed under that management group
- the required customer-side Entra applications
- the appropriate least-privilege role assignments
- the Azure DevOps service connections required by the pipeline
Understand pipeline wiring and files in Azure DevOps
Once the service connections are ready, you must understand the project files available in the git repository.
Repository files you must understand

Understanding the pipeline structure
The deployment flow is controlled by a single entrypoint file: .azure-pipelines/epac-dev-pipeline.yml, which is the backbone of our project. You can download the entire project via this git repository.
Epac-dev-pipeline.yml is intentionally small. It does not contain the full deployment logic. Instead, it defines the orchestration model for the EPAC workflow by declaring:
- which service connection is used for each security boundary
- which EPAC environment should run
- which folders should be treated as the definitions root and output root
- which stage runs before the next one
At the top of the file, the most important variables are:
- planServiceConnection
- deployServiceConnection
- rolesServiceConnection
- pacEnvironmentSelector
As discussed in detail in the previous section, the first three service connections (Plan, Deploy, Roles) listed above securely provide Azure DevOps access to the delegated management group in the customer tenant, while pacEnvironmentSelector acts as the switch that tells the pipeline which EPAC environment definition to use.
What that means in practice:
the YAML itself does not contain the full customer/environment configuration. Instead, it passes pcpbaseline into the PowerShell scripts, and those scripts look up the matching environment block in Definitions/global-settings.jsonc.
Onboarding a new customer via the pipeline
At this point, the goal is to connect those prepared components to the EPAC repository and let the pipeline apply Azure Lighthouse consistently.
Bind the customer service connections to the pipeline
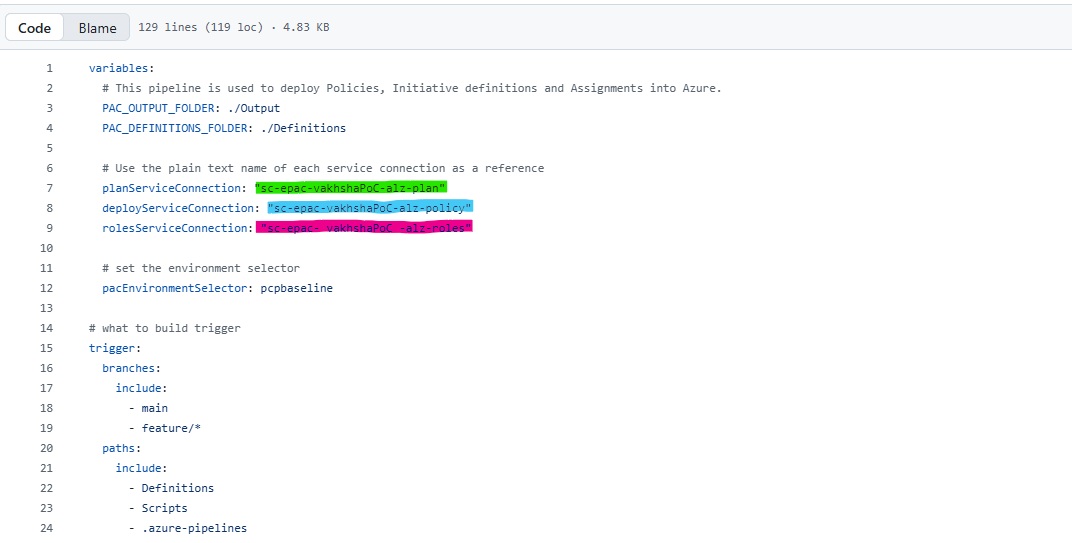
At the top of epac-dev-pipeline.yml, you must enter the name you used for the three service connections you previously created based on Section 5 of this article as I highlighted in the above picture. The names must match exactly as they exist in Azure DevOps. Even a small difference in spacing can cause YAML validation failure before the run even starts.
Onboard a Lighthouse customer using EPAC environment
Next, the repository must point to the correct customer governance boundary. That is controlled in global-settings.jsonc. For each new customer, we must define whatever you see inside {} and change the highlighted sections.
A safe pattern looks like this:
{
            "$schema": "https://raw.githubusercontent.com/Azure/enterprise-azure-policy-as-code/main/Schemas/global-settings-schema.json",
            "pacOwnerId": "f9c6d389-1f02-4341-95f8-6c6c6b7d557b",
            "pacEnvironments": [
              {
                "pacSelector": "pcpbaseline",
                "cloud": "AzureCloud",
                "tenantId": "11111111111-11111111-11111111",
                "deploymentRootScope": "/providers/Microsoft.Management/managementGroups/alz",
                "desiredState": {
                  "strategy": "ownedOnly",
                  "keepDfcSecurityAssignments": true,
                  "doNotDisableDeprecatedPolicies": false
                },
                "globalNotScopes": [],
                "managedIdentityLocation": "westeurope"
              },
              {
                "pacSelector": "test-poc",
                "cloud": "AzureCloud",
                "tenantId": "22222222-2222-2222-2222-222222222222",
                "deploymentRootScope": "/providers/Microsoft.Management/managementGroups/test-poc-mg",
                "desiredState": {
                  "strategy": "ownedOnly",
                  "keepDfcSecurityAssignments": true,
                  "doNotDisableDeprecatedPolicies": false
                },
                "globalNotScopes": [],
                "managedIdentityLocation": "westeurope"
              },
              {
                "pacSelector": "customer-b",
                "cloud": "AzureCloud",
                "tenantId": "33333333-3333-3333-3333-333333333333",
                "deploymentRootScope": "/providers/Microsoft.Management/managementGroups/customer-b-mg",
                "desiredState": {
                  "strategy": "ownedOnly",
                  "keepDfcSecurityAssignments": true,
                  "doNotDisableDeprecatedPolicies": false
                },
                "globalNotScopes": [],
                "managedIdentityLocation": "northeurope"
              }
            ]
          }
What does each variable entry mean:
- pacSelector: unique environment name. This is the key the scripts and pipeline use to select the target environment.
- tenantId: the customer tenant ID, not the MSP tenant ID.
- deploymentRootScope: the full ARM path to that customer's management group.
- desiredState: usually keep this same unless you intentionally want different lifecycle behavior.
- globalNotScopes: optional exclusions for that customer.
- managedIdentityLocation: region for identity-backed policy assignments.
Running the pipeline and use Lighthouse
You can easily use epac-dev-pipeline.yml and spin up a new pipeline.
As shown in the pipeline run, the workflow is split into five stages:
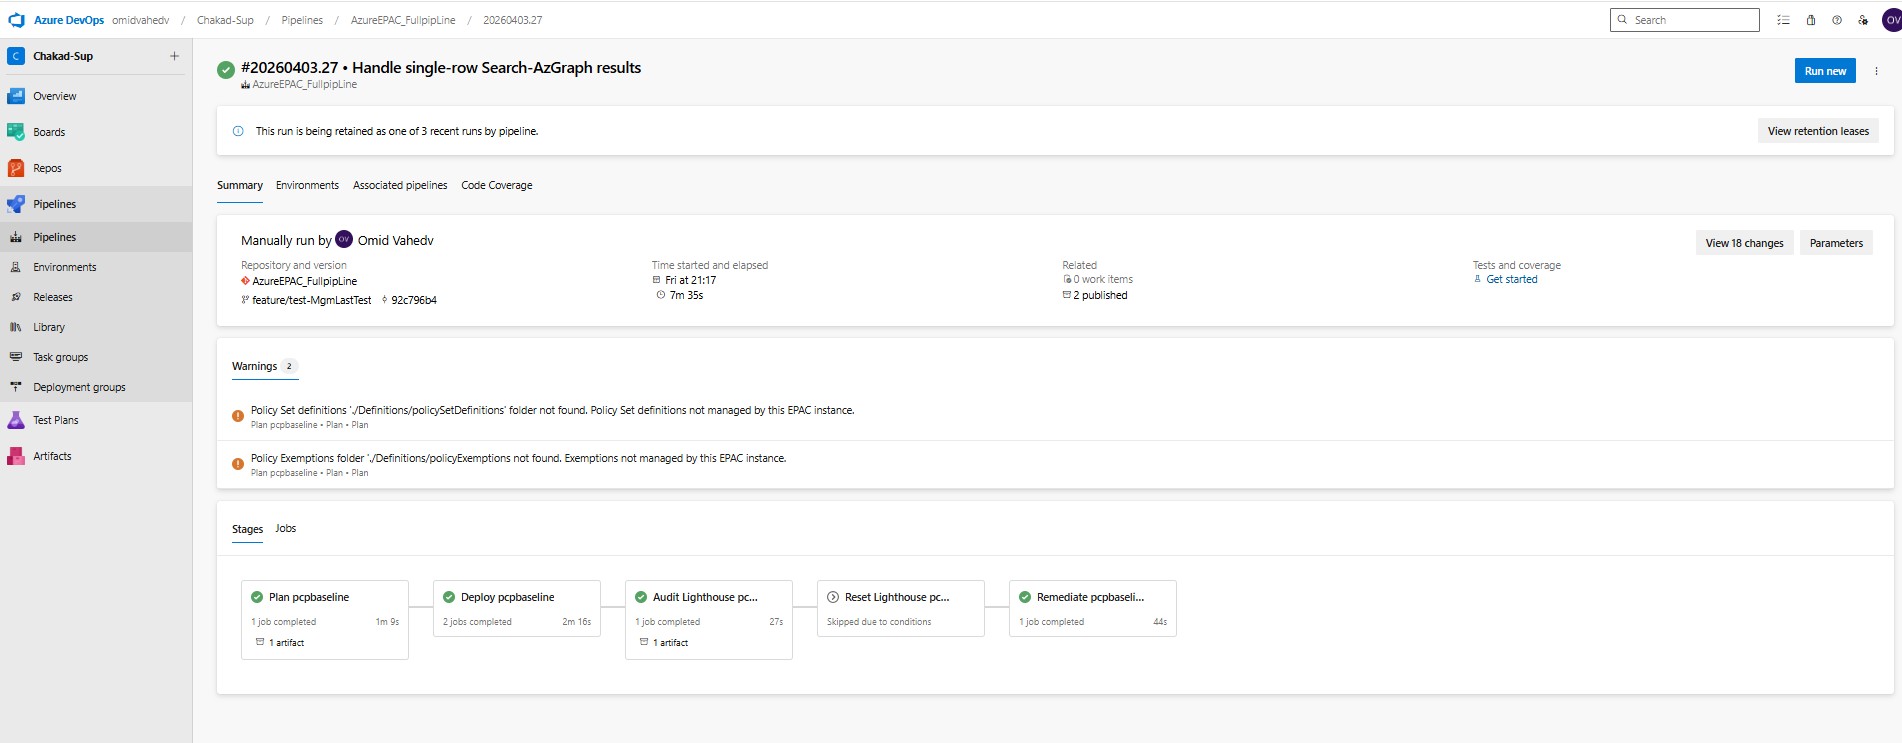
Plan, Deploy, Audit Lighthouse, Reset Lighthouse, and Remediate.
The Plan stage reads the EPAC definitions and builds the deployment plan without changing Azure resources.
The Deploy stage applies policy and RBAC changes using separate service connections, which keeps permissions aligned with least-privilege design.
The Audit Lighthouse stage then checks the current delegation state after deployment. If stale delegations are detected, the Reset Lighthouse stage can remove them, but only when the condition is met.
Finally, the Remediate stage creates remediation tasks so that inherited subscriptions under the management group converge to the intended Azure Lighthouse state.
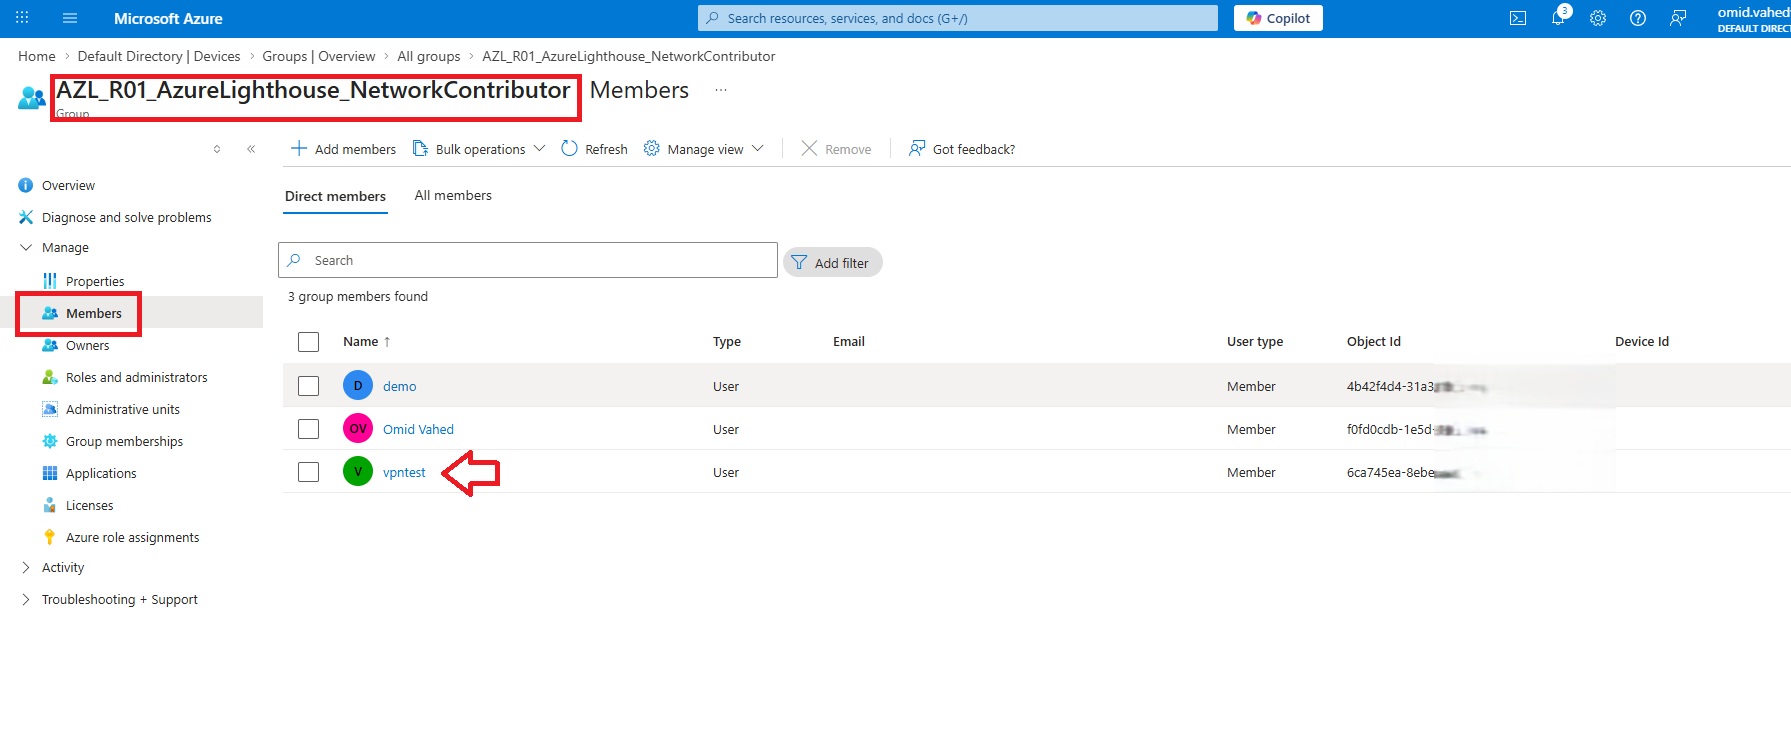
Assigning the test user to the security groups
In the MSP tenant, I simply assigned a user named vpntest, as shown below, to the six security groups we created earlier in Section 3.1. This is the only configuration required on the MSP tenant.
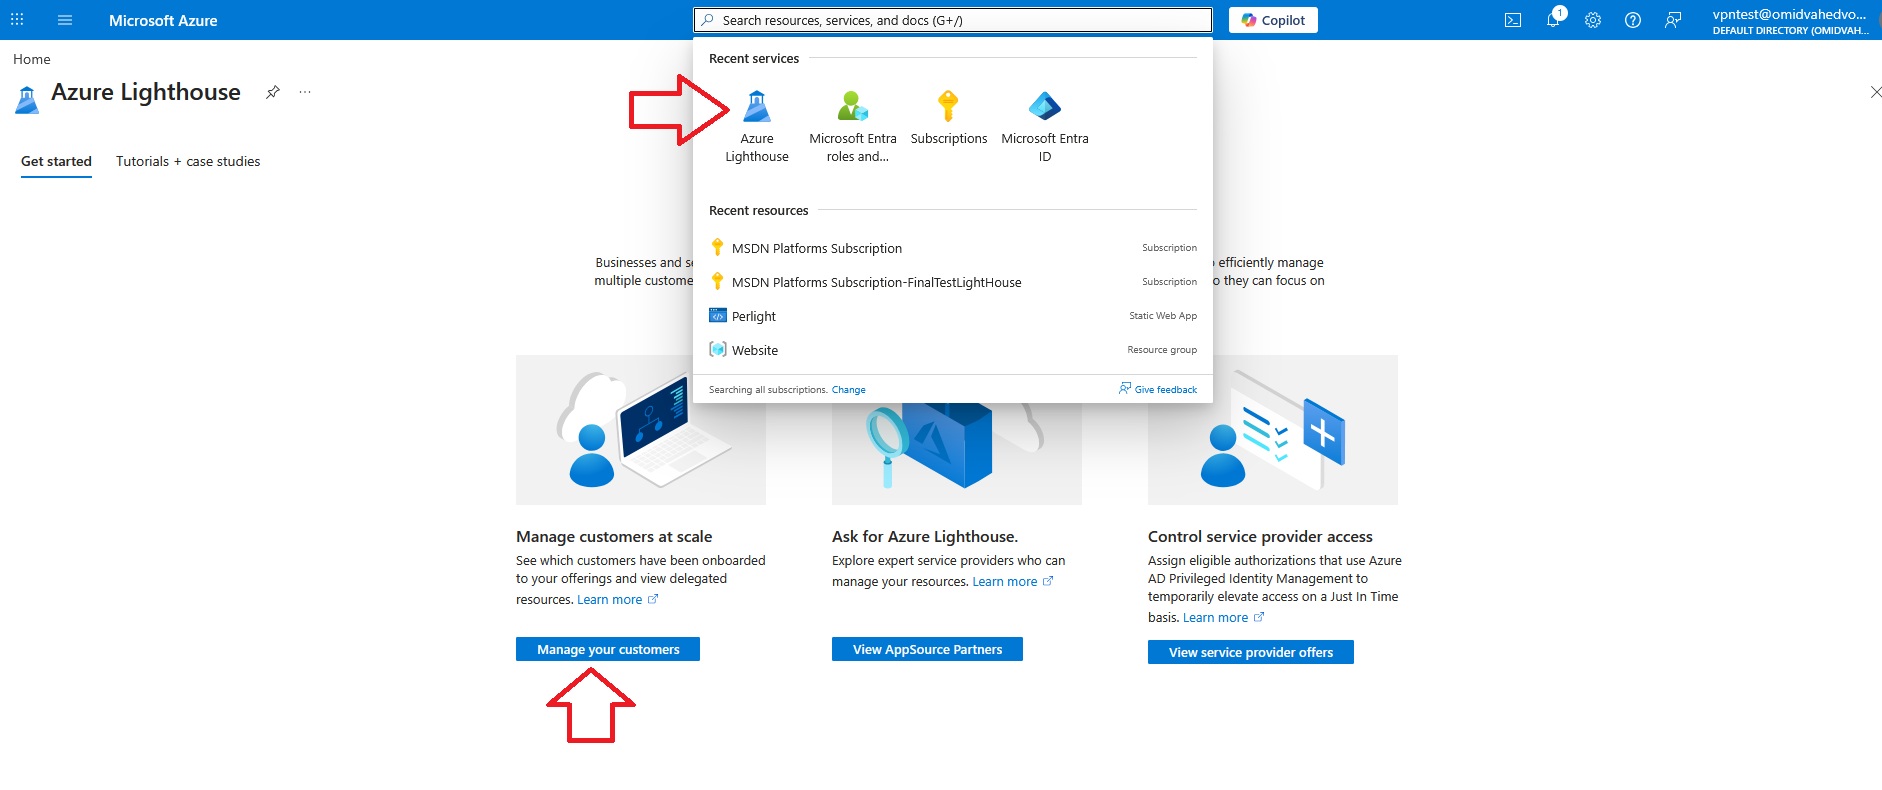
Verifying the Lighthouse implementation and available eligible roles
The final step is to verify that the Lighthouse implementation works as expected and that the eligible roles are available correctly:
The section highlighted in green shows the role that is already assigned as an active permanent assignment. In this example, the user has the Reader role active on the delegated subscription through the corresponding MSP Entra ID group.
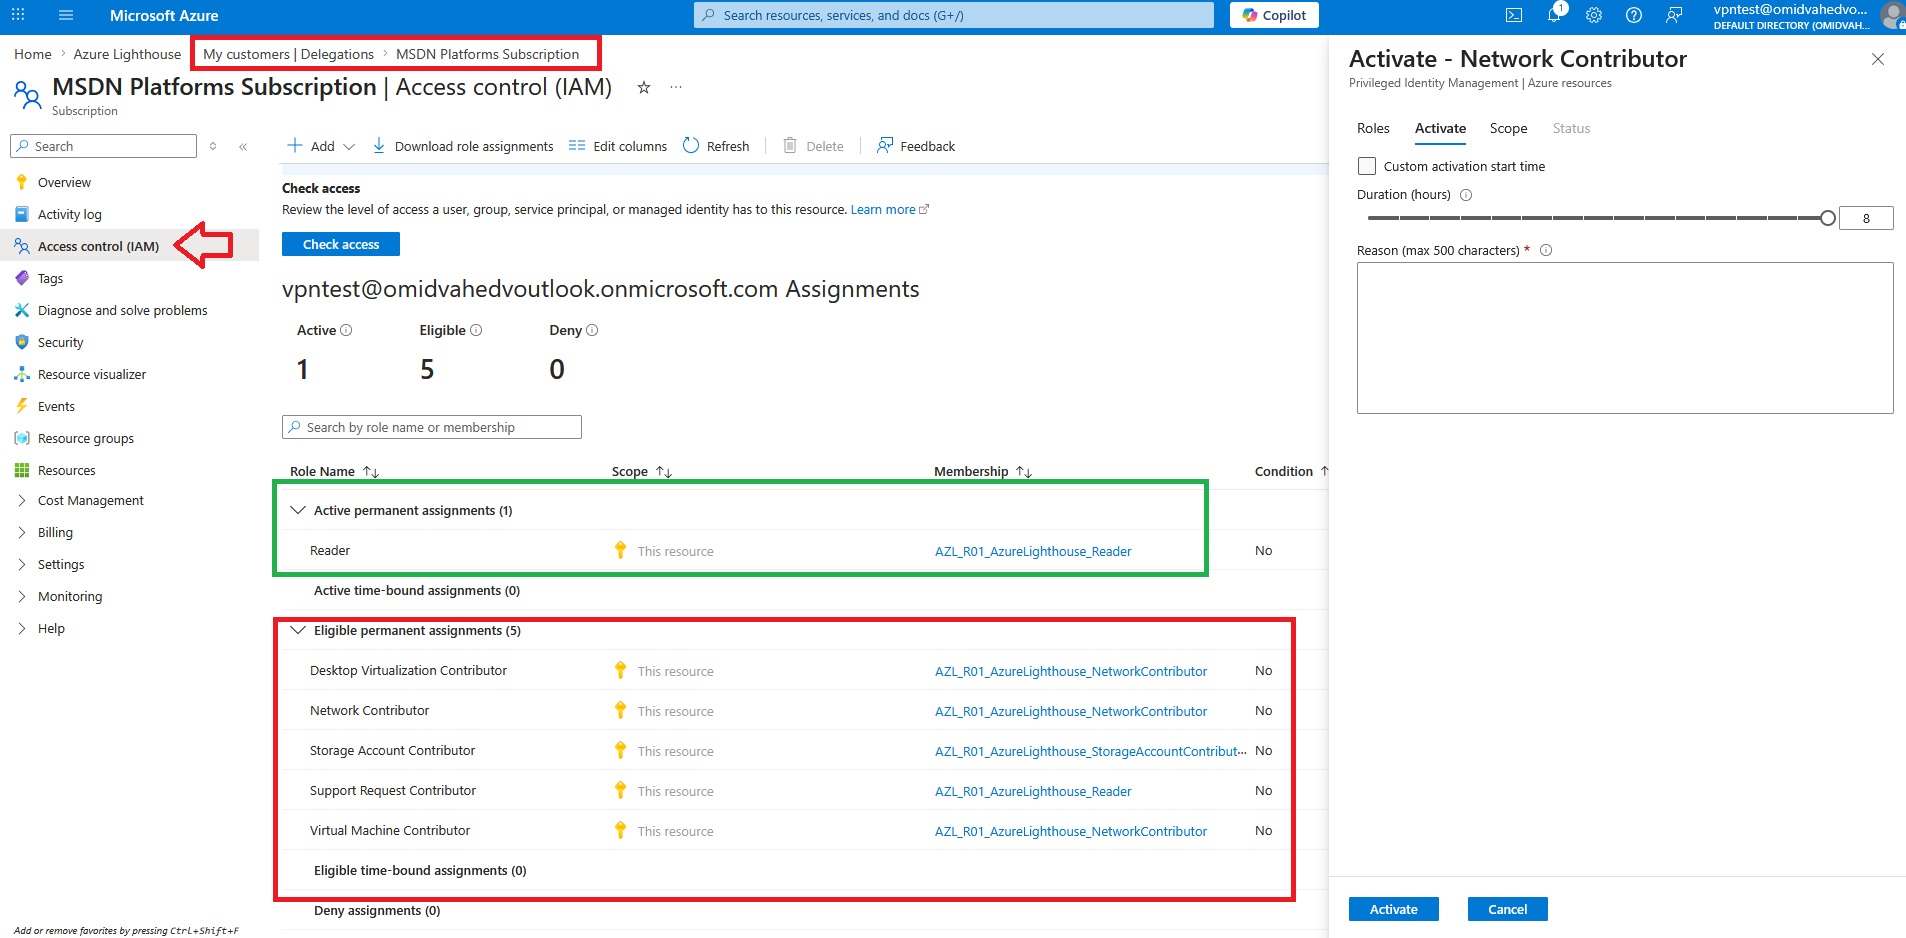
The section highlighted in red shows the roles that are available as eligible permanent assignments. These are not active by default, but the user can activate them when needed through Privileged Identity Management (PIM). In this example, the eligible roles include Desktop Virtualization Contributor, Network Contributor, Storage Account Contributor, Support Request Contributor, and Virtual Machine Contributor.
Conclusion
By combining Azure Lighthouse, EPAC, Azure DevOps, and workload identity federation, you can turn Azure Lighthouse onboarding into a repeatable and production-ready process instead of a manual, subscription-by-subscription task.
In this article, we prepared the MSP and customer environments, created separate Entra applications and service connections for each pipeline stage, and wired everything into an EPAC-driven deployment model. This approach improves consistency, supports least privilege, and makes onboarding new customers much easier to govern and repeat.
The main benefit of this pattern is that Azure Lighthouse becomes part of a controlled operating model rather than a one-time manual setup. With the right definitions, role mappings, and pipeline configuration in place, new customer onboarding becomes faster, safer, and more scalable.