Publish Private Azure Container Apps with Application Gateway (WAF) + Log Analytics
In this post, we’ll take a hands-on look at publishing an AI chatbot hosted on Azure Container Apps via Azure Application Gateway. Then we’ll dive into the incoming traffic and WAF logs using the Log Analytics workspace associated with the Application Gateway.
ToC
- Introduction
- The Challenge: Ingress & Custom Domain Binding
- The Solution: Azure Private DNS
- Linking Private DNS to Virtual Networks
- Validating DNS Resolution
- Why Application Gateway? (vs. Front Door or Load Balancer)
- Creating the Application Gateway & WAF Policy
- Certificate Configuration
- Option 1: Using PowerShell (Test/Self-signed)
- Option 2: Using a CA-signed Certificate (Production)
- Routing Rules & Listener Configuration
- Backend Target & Settings (Hostname Override)
- Verifying Backend Health
- Configuring Diagnostics & Log Analytics
- Analyzing Traffic Logs (with KQL)
- Analyzing WAF Logs (with KQL)
- Summary
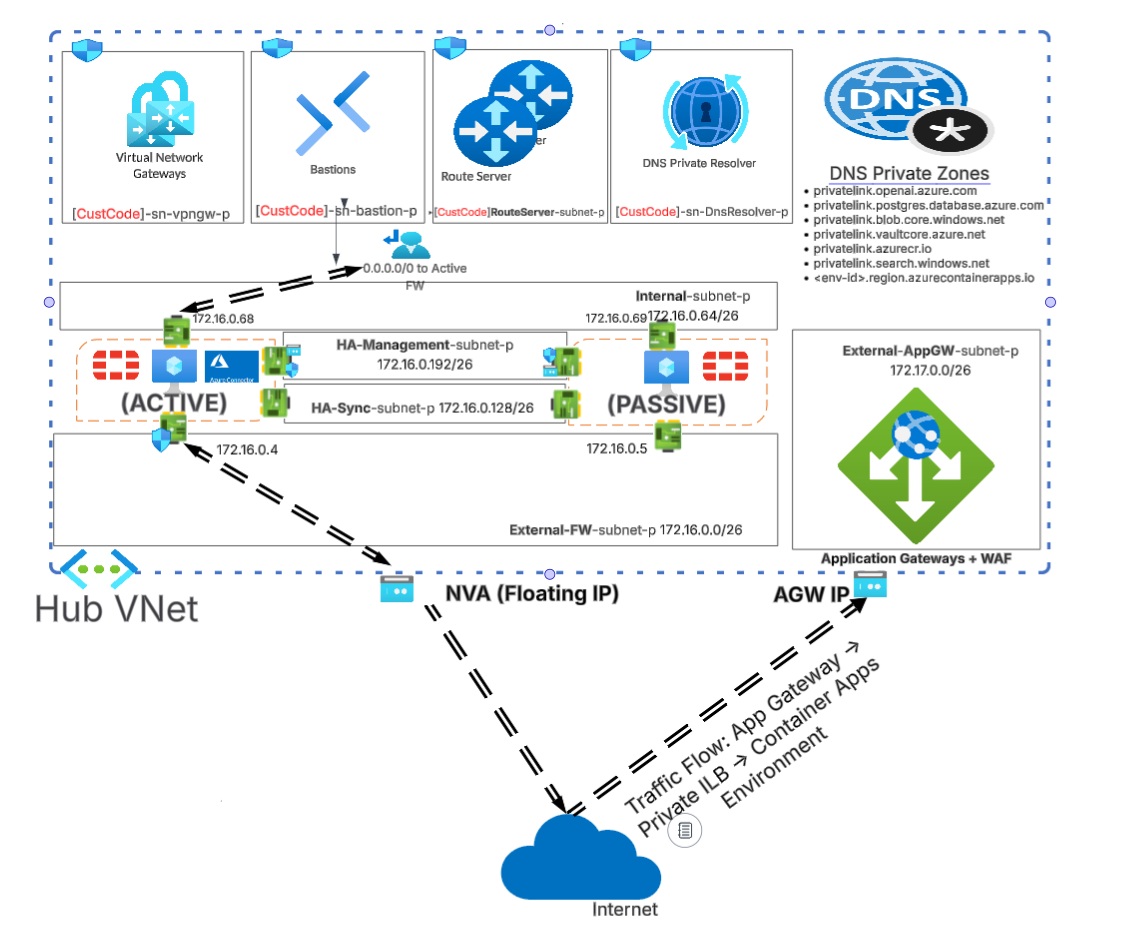
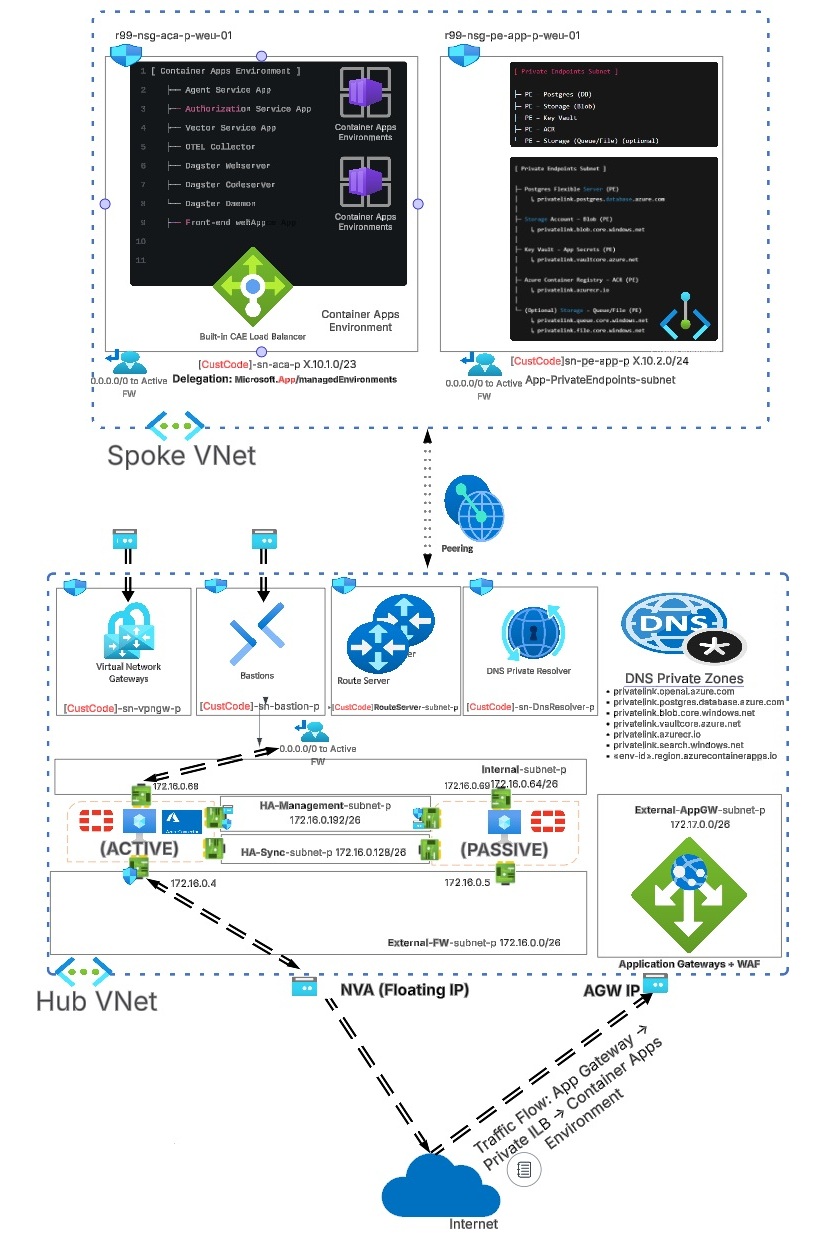
If you want a deeper look at how the Container Apps environment is deployed and how to integrate it with a VNet + an NVA for outgoing internet access, I highly recommend starting with the previous article here.
The diagram below provides a high-level view of the hub-and-spoke VNet architecture and how inbound internet traffic flows through Application Gateway to reach the Container Apps Environment (CAE).
If we check the overview of the Container Apps Environment (CAE), we usually see either a private IP or a public IP associated with the environment. In our setup, we only see a private IP address because we intentionally disabled public access when we created the CAE.
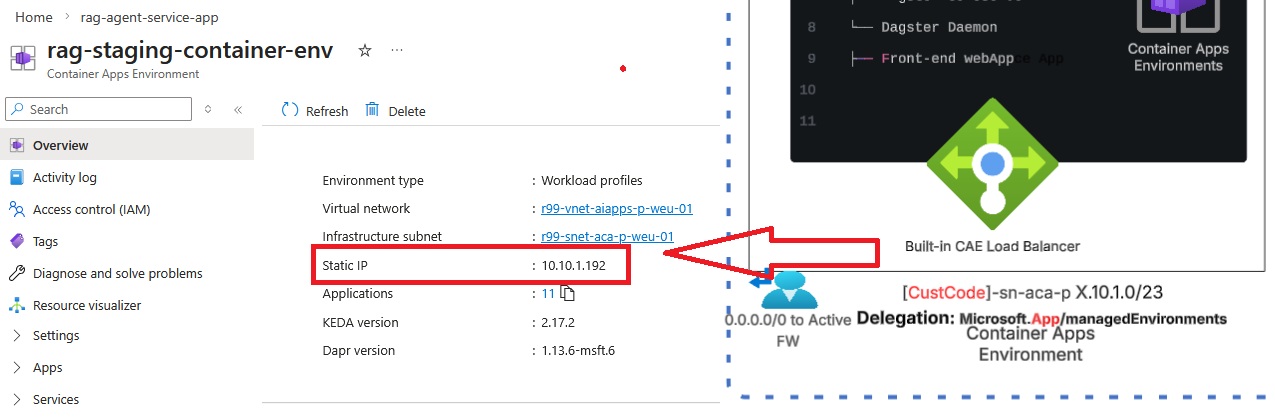
The IP address you see there is the built-in IP of an internal load balancer at the edge of the CAE. keep in mind we're not able to configure it directly or have too much influnce over this built-in load balancer. Its job is to distribute incoming traffic between your container apps.
The challenge is: we cannot publish container apps by using only that private IP. We must combine it with the domain name that is associated with each container app. This technique is called Ingress + Custom domain binding (For those who come from Micorsoft IIS background you might remember Site Bindings). This method helps because it lets Azure expose many container apps behind a single ingress IP/endpoint and still route each request to the right container app using the hostname (the same concept as IIS “host header” site bindings).
Now let’s find the original domain name associated with the container application we want to publish and see whether we can resolve it using public DNS servers.
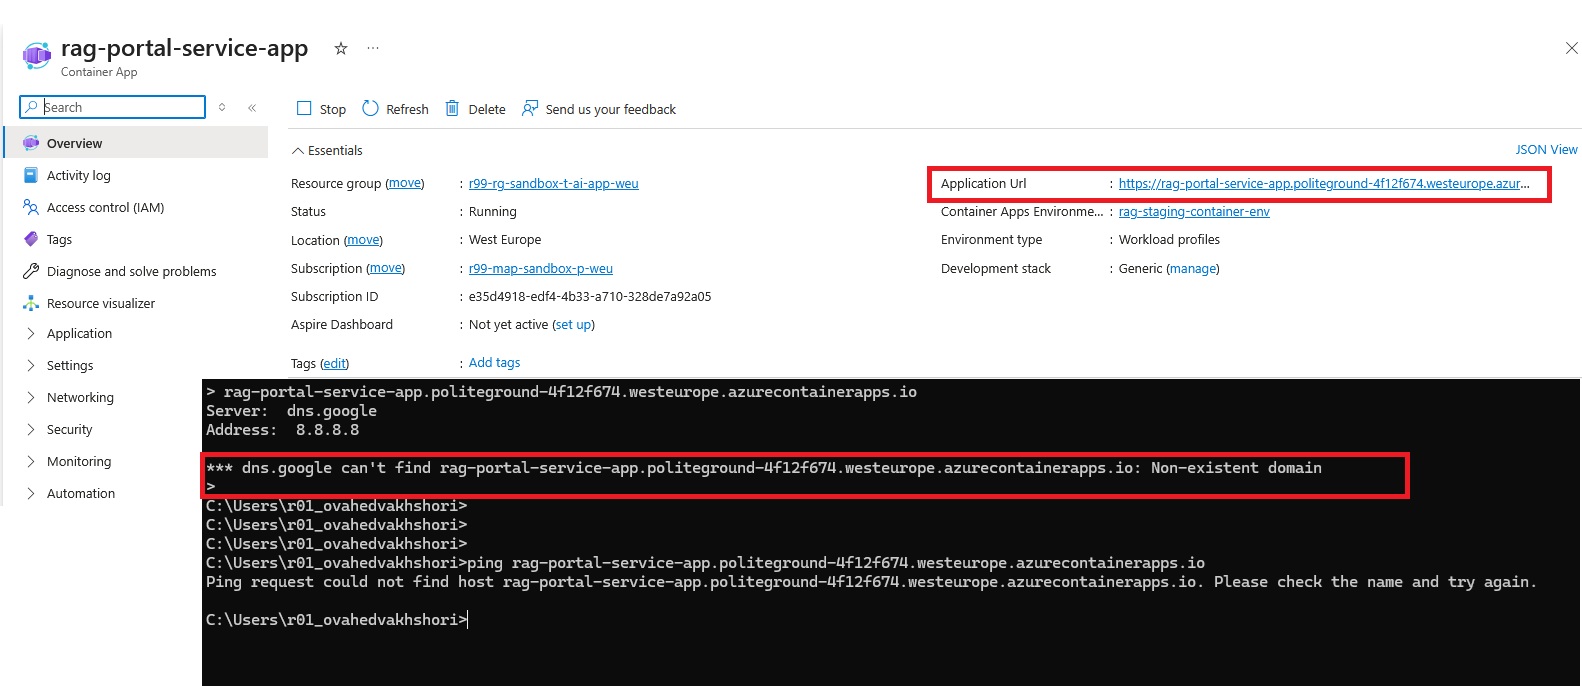
As you can see, it is not possible to resolve the DNS name that is originally assigned to the container app. The reason is intially the Container Application Environment was deployed without any public IP address, then this makes perfect sense. How do we expect the public DNS to resolve a name that is not even exposed to the public internet?
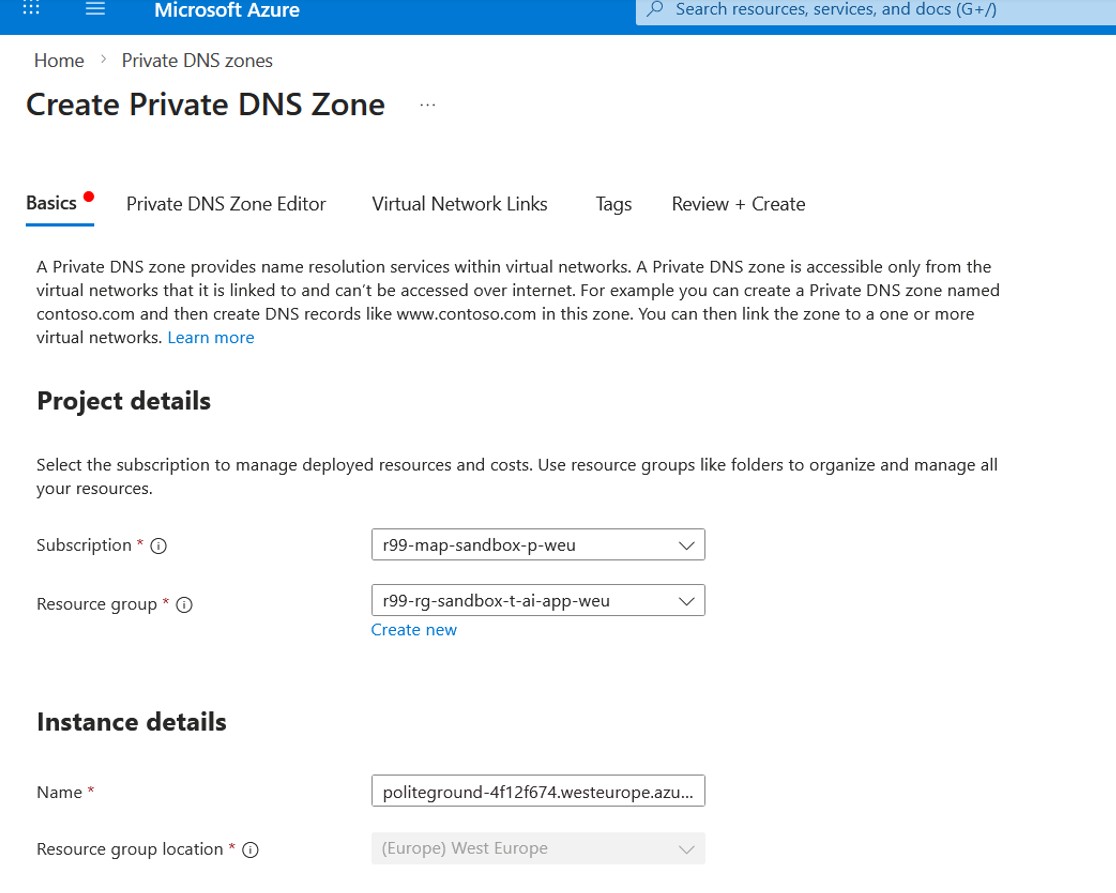
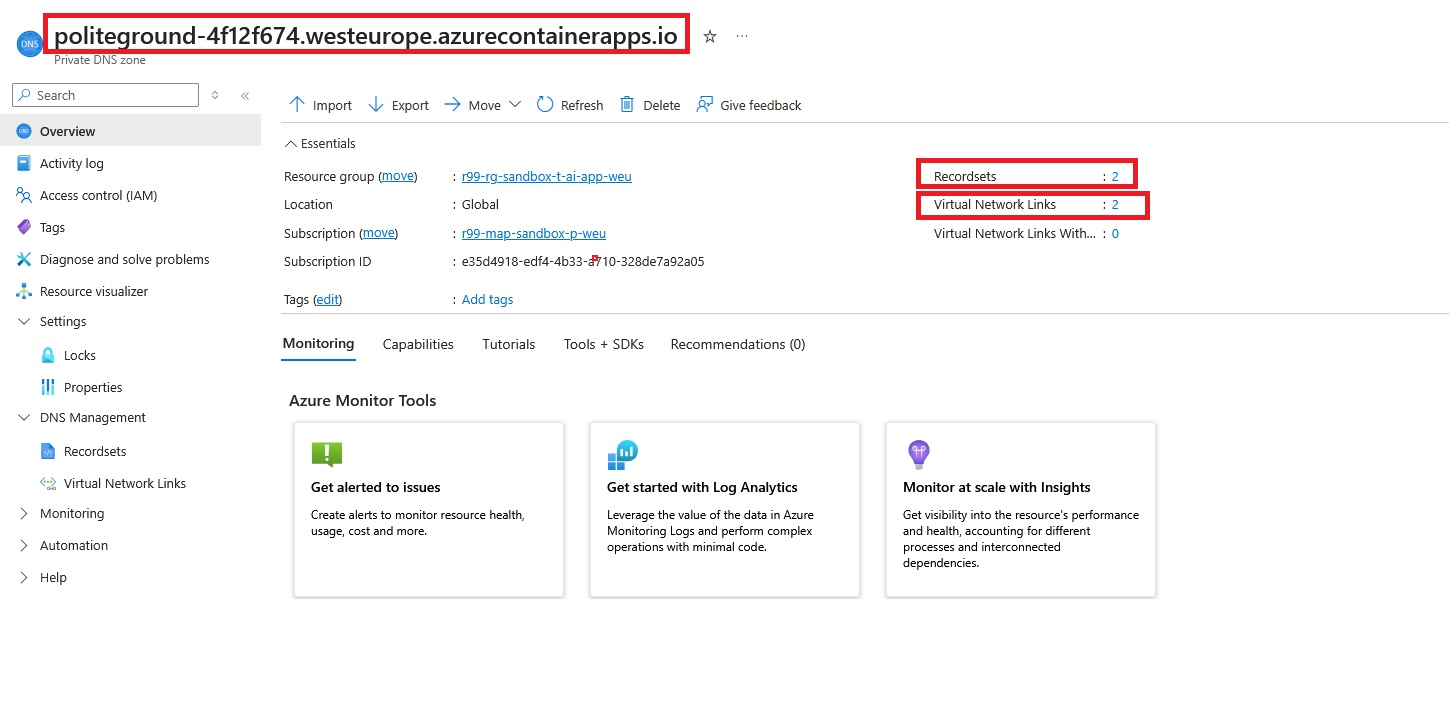
The good news is: Azure Private DNS can act as a quick private DNS solution. We already have the domain name. After removing the hostname (rag-portal-service-app), we can use the remaining subdomain labels ( politeground-4f12f674.westeurope.azurecontainerapps.io) to create the Private DNS zone.
The Private DNS Zone editor is where we create two basic DNS record rules that tell our network which IP address a domain name should resolve to.
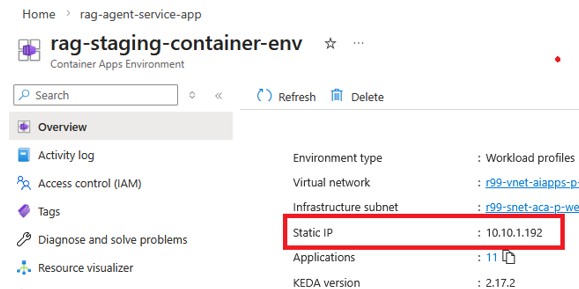
In the DNS zone for politeground-4f12f674.westeurope.azurecontainerapps.io, I added a wildcard * A record that points to 10.10.1.192 (the CAE private IP address).
politeground-4f12f674.westeurope.azurecontainerapps.io
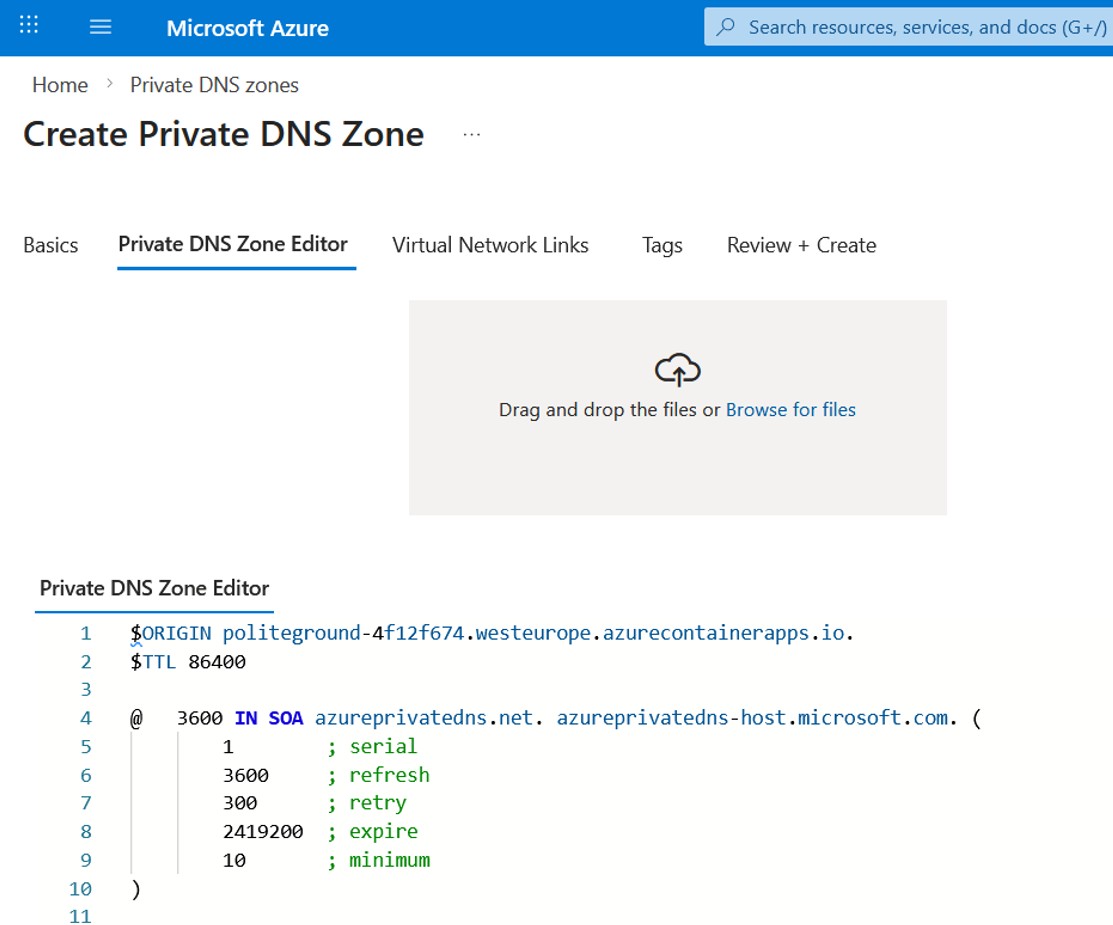
$ORIGIN politeground-4f12f674.westeurope.azurecontainerapps.io.
          $TTL 86400

          ; Wildcard A record -> CAE private IP
          *   86400   IN  A   10.10.1.192

          @   3600    IN  SOA azureprivatedns.net. azureprivatedns-host.microsoft.com. (
              1       ; serial
              3600    ; refresh
              300     ; retry
              2419200 ; expire
              10      ; minimum
          )
In simple terms, this means any subdomain under that zone (e.g. rag-portal-service-app.politeground-4f12f674.westeurope.azurecontainerapps.io) will resolve to the same private IP. This is a convenient way to direct multiple container app hostnames to a single internal endpoint, while keeping access limited to the networks where this Private DNS zone is linked.
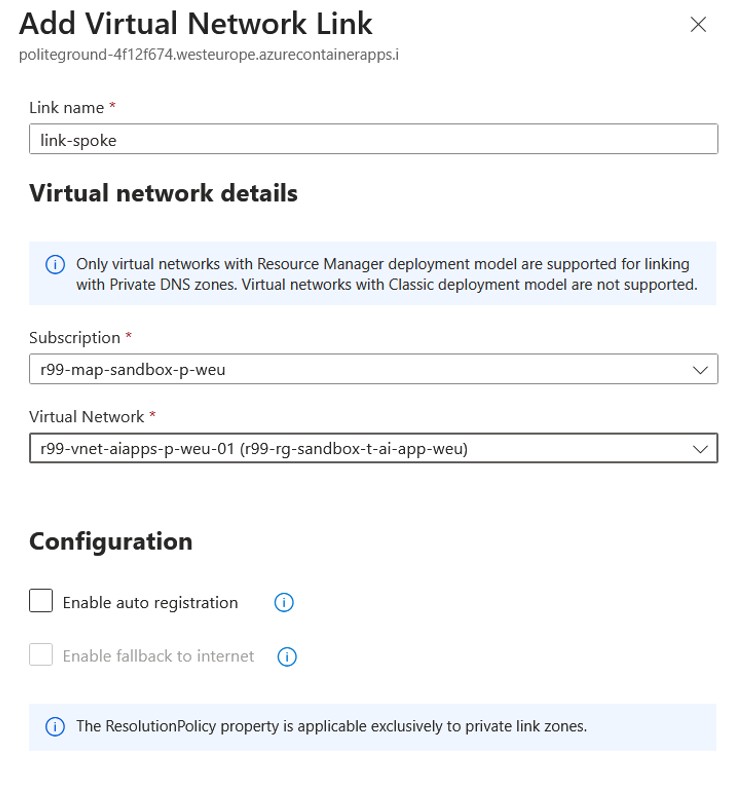
Now it's time to move on to the next step and link this Private DNS zone to the virtual network where the Application Gateway and Container Apps Environment are deployed. This is what makes the zone effective: once the link is created, any resource in that VNet can resolve the private FQDN and get the private IP instead of a public endpoint.
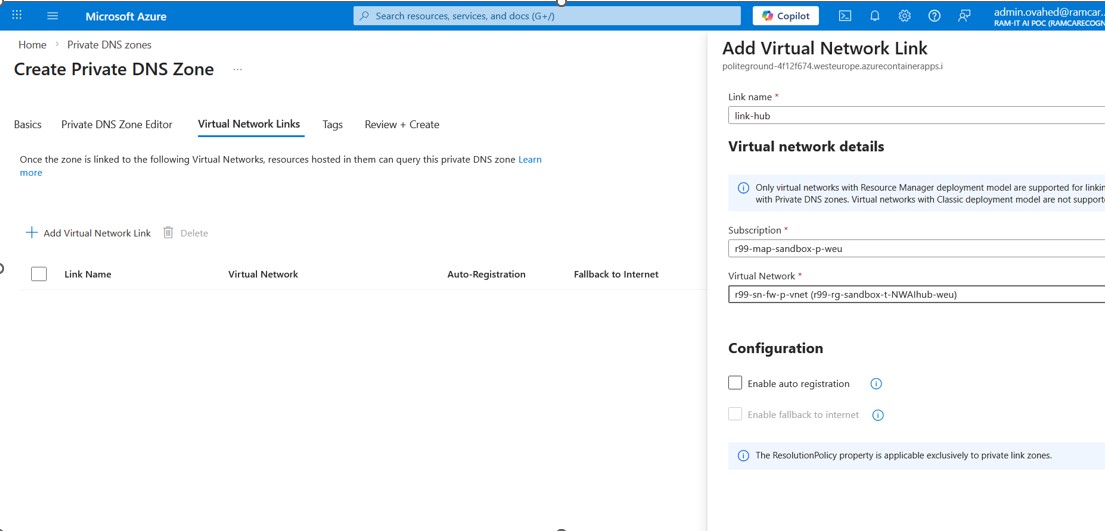
Let's start by adding a link to the Hub vNet where App. Gateway resides. This is what makes the zone effective: once the link is created, any resource in that VNet can resolve the private FQDN and get the private IP instead of a public endpoint.
- Auto-registration: keep it disabled (mainly used for VM hostname registration; not required here)
- Fallback to internet: keep it off to ensure name resolution stays private-only
We also need to create another link to the VNet where the Container Apps Environment resides.
Eventually, your new Private DNS zone looks like this:
Before creating the Application Gateway, let’s validate the private resolution by using into a VM in the same VNet as the Container Apps environment and confirming that the container app FQDN resolves correctly.
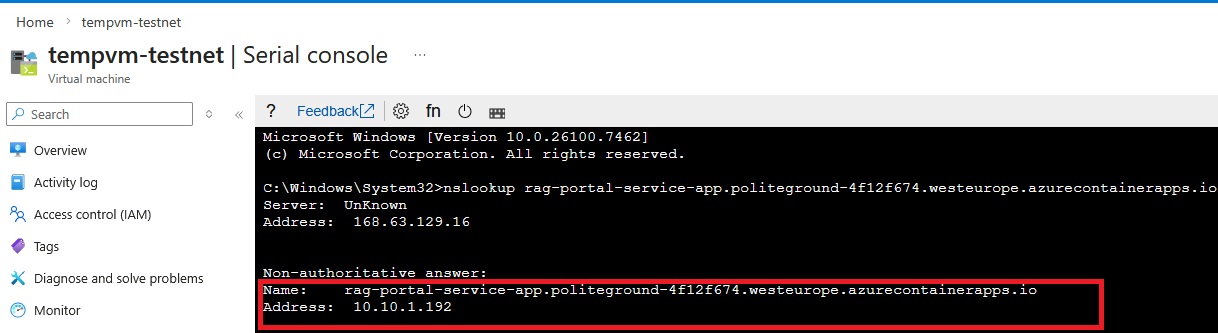
Here we can see the IP address corresponding to the Container Apps Environment IP address.
Now we're ready to start the Application Gateway configuration, but before that, let’s quickly answer the question: why do we even need Application Gateway when there are other load balancer options like Azure Front Door and Azure Load Balancer?
Let's look at the following picture that helps us compare options at a high level:
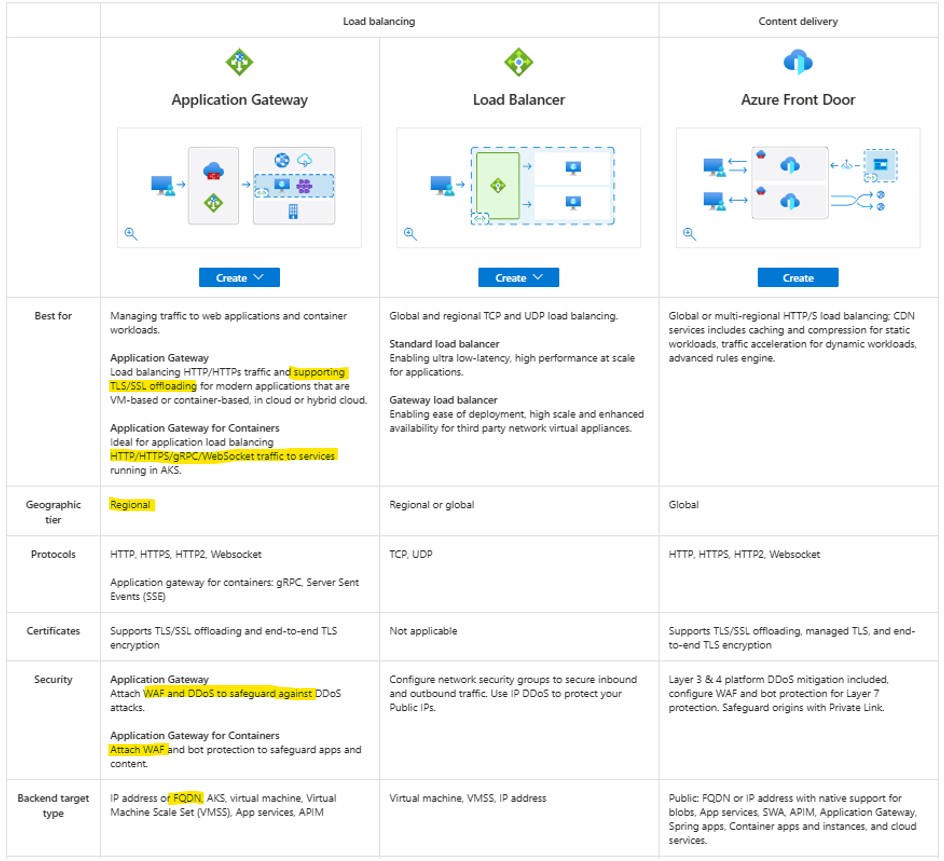
Why Application Gateway is the best choice:
Application Gateway is a great choice for publishing Azure Container Apps because it is designed for web traffic (HTTP/HTTPS) and provides capabilities that a basic load balancer does not, such as:
- hostname/path-based routing
- TLS/SSL termination (or end-to-end encryption)
- Web Application Firewall (WAF) protection
Why not Front Door or a basic Load Balancer?
Azure Load Balancer works at the network layer (TCP/UDP). It cannot terminate HTTPS, manage certificates, or route requests based on hostnames and URL paths. Azure Front Door is mainly designed for global, internet-facing acceleration and CDN scenarios. Application Gateway is the most practical choice when you need a single regional gateway to securely publish multiple container apps behind one endpoint.
Eventually, it's time to create an Application Gateway:
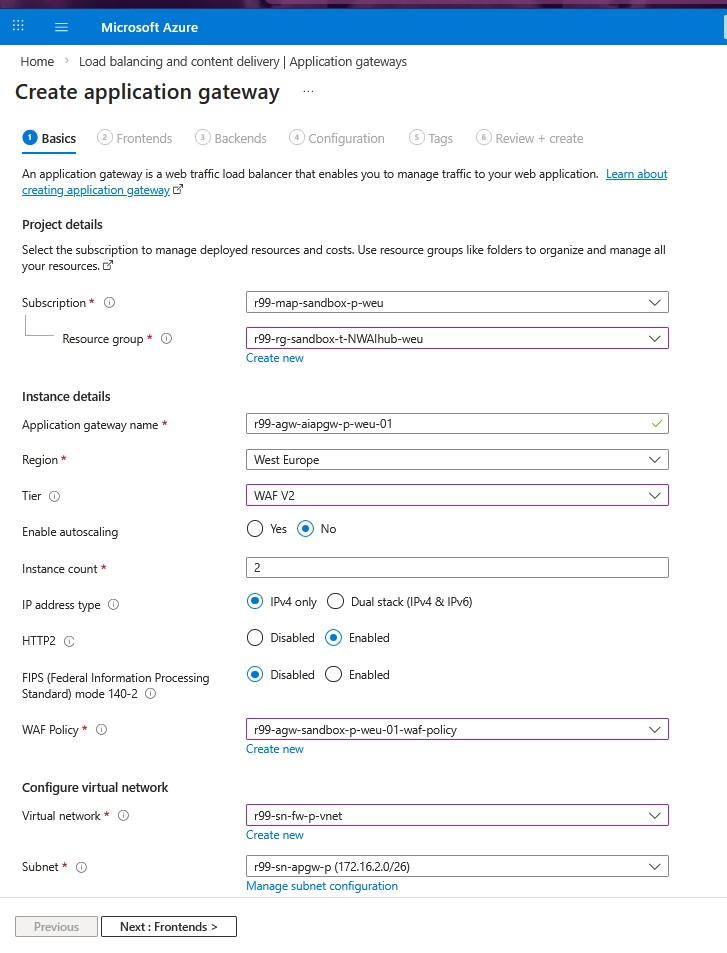
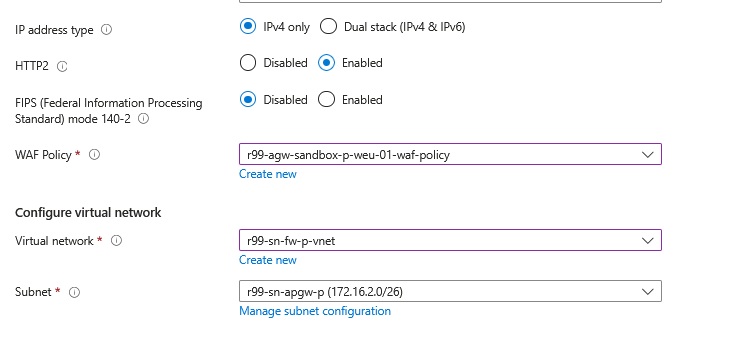
We use the WAF v2 tier instead of Standard_v2 because it adds built-in web attack protection in front of our applications. WAF can inspect HTTP/HTTPS traffic and block common threats like SQL injection and cross-site scripting (XSS) using managed and custom rules.
One of the most important configuration for a WAF-enabled Application Gateway is the WAF policy.
WAF policy is a set of security rules that protects your web apps from common attacks. In Azure Application Gateway, the WAF policy is where you configure managed rule sets, custom rules, and exclusions, and then attach that policy to the gateway (or to specific listeners/routing rules) so it is enforced on incoming HTTP/HTTPS traffic.
For more information about the WAF policy configuration, please check the official documentation here.
HTTP/2 enabled improves performance and efficiency for HTTPS traffic (fewer connections, better throughput).
FIPS disabled avoids extra compliance overhead we do not need in a PoC. This helps us focus on validating routing and publishing the CAE quickly.
The Application Gateway must be deployed in the hub VNet, and it requires a dedicated subnet with a minimum size of /26.
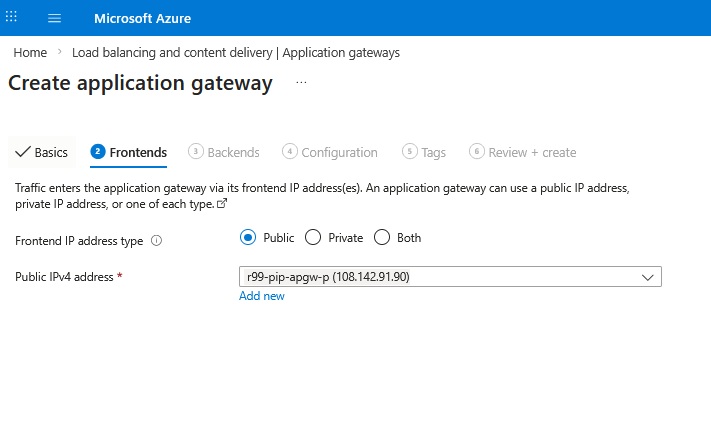
On the Frontends tab, we select a Public frontend IP and attach our existing public IPv4 address. This gives the Application Gateway a single internet-facing entry point that clients can reach, while the gateway forwards requests to our Container Apps over the private network.
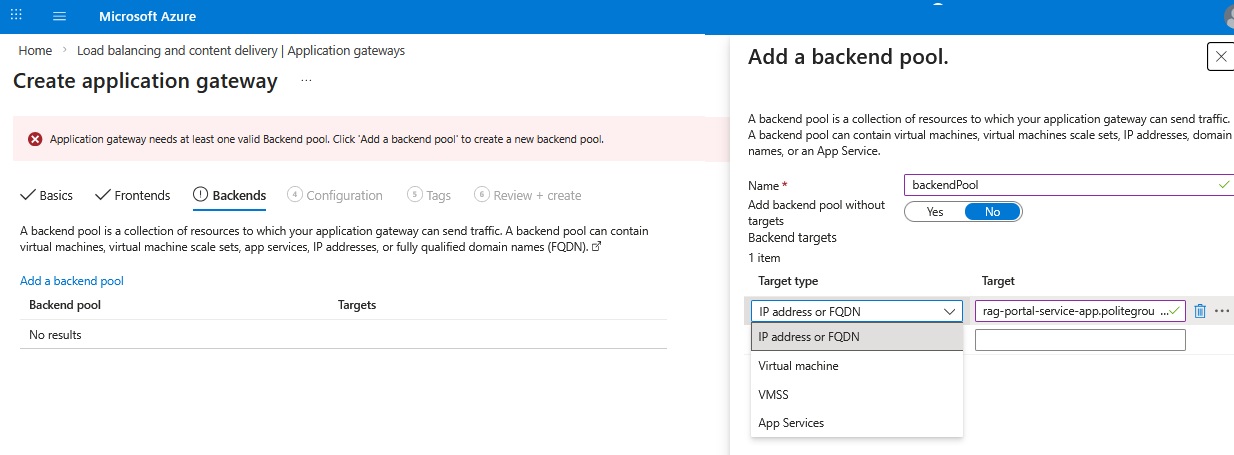
In this section, we need to configure our backend pool. Since our Container Apps Environment is private and only resolvable within the VNet, we use the FQDN option and point it to the application is hosted in the CAE domain name:
rag-portal-service-app.politeground-4f12f674.westeurope.azurecontainerapps.io
This way, the Application Gateway can resolve the backend target using the Private DNS zone we set up earlier and route traffic to the correct private IP address of the CAE.
Before moving to the next step, we must issue a proper certificate. You can either use a publicly trusted certificate provider, or if you are dealing with a test environment, you can generate a self-signed certificate using PowerShell on Windows. Let’s briefly look at both methods:
1-Using PowerShell (test purpose only):
- Using a self-signed certificate results in the big red browser warning that the website is not secure.
Open PowerShell as administrator and execute the following script.
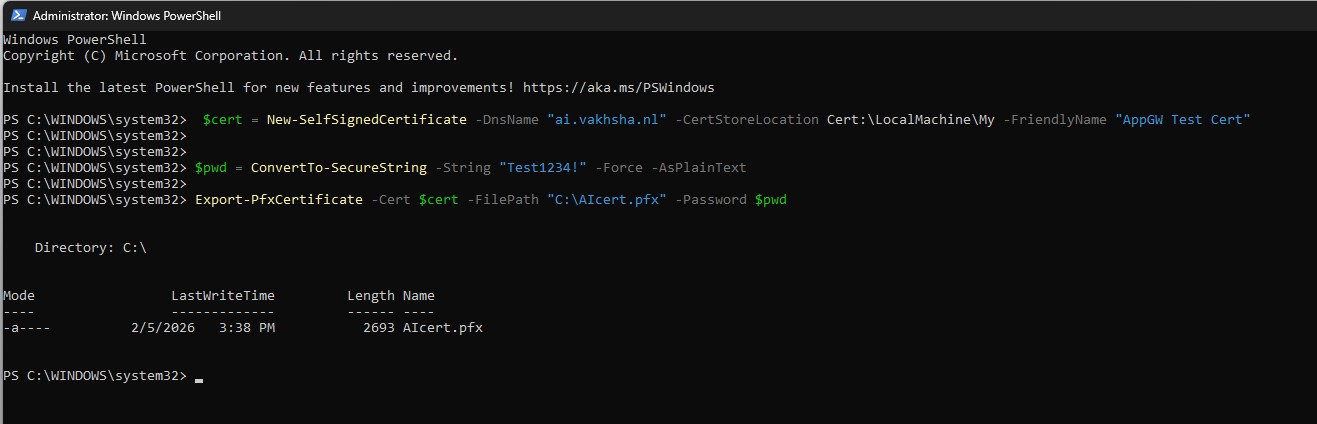
 $cert = New-SelfSignedCertificate -DnsName "ai.vakhsha.nl" -CertStoreLocation Cert:LocalMachineMy -FriendlyName "AppGW Test Cert"

          $pwd = ConvertTo-SecureString -String "Test1234!" -Force -AsPlainText

          Export-PfxCertificate -Cert $cert -FilePath "C:AIcert.pfx" -Password $pwd
This will create a self-signed certificate for the domain ai.vakhsha.nl and export it as a PFX file that we can upload to the Application Gateway listener later.
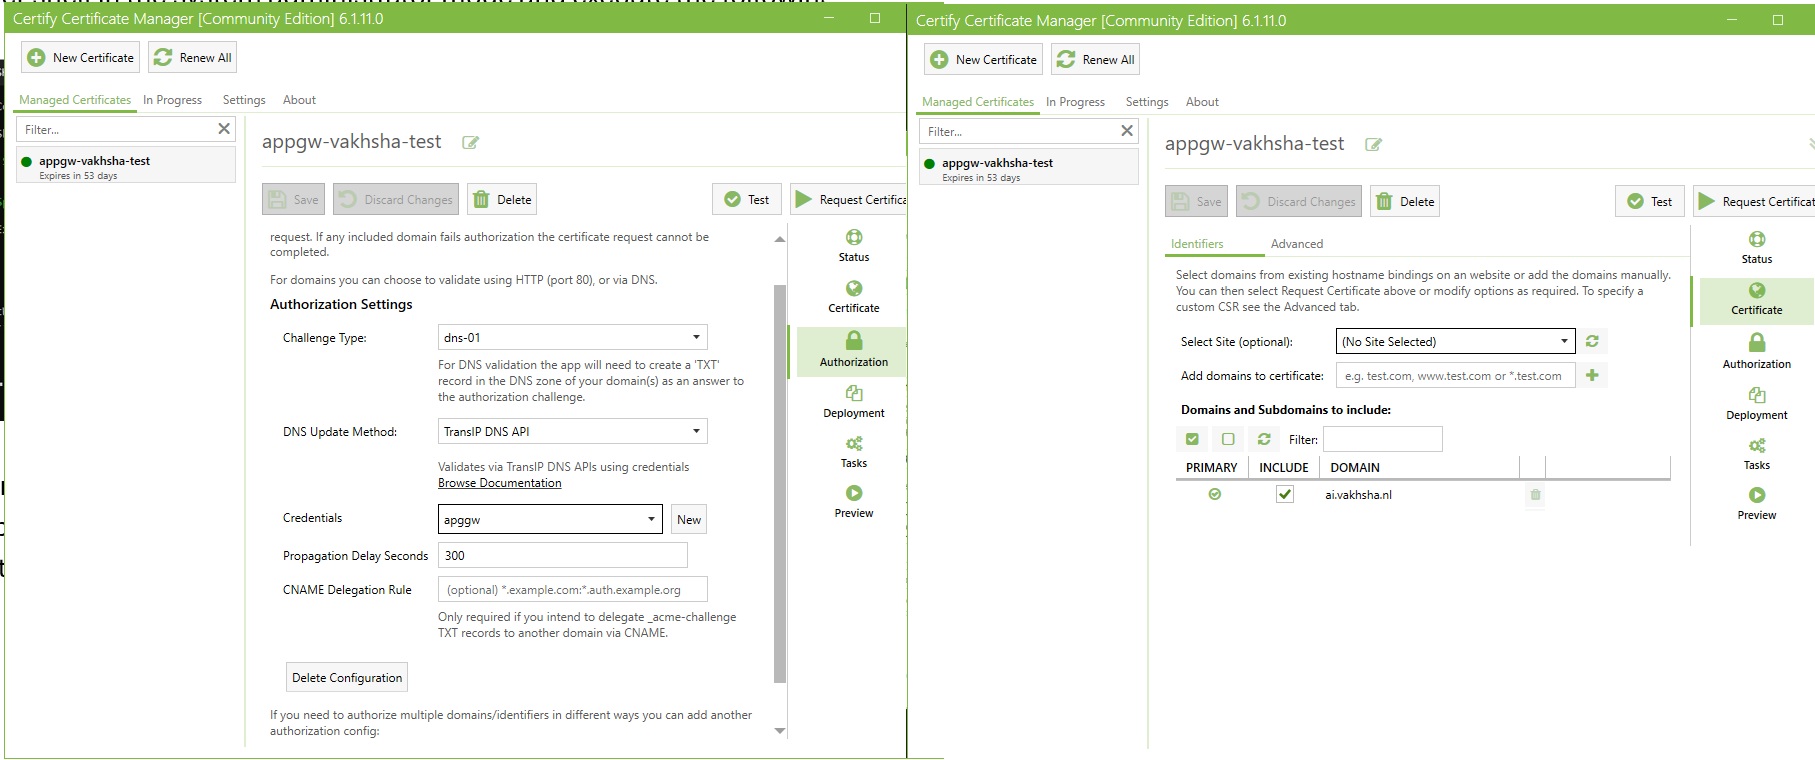
2-Using A CA signed certificate (Production Ready):
If you are working on a production domain, you should adopt a more enterprise approach. If you like a simple UI-based tool, I suggest downloading the CertifyTheWeb Tool here.
You can find a full tutorial for using CertifyTheWeb here
The following screenshots show a summary of creating a certificate request using CertifyTheWeb for the domain ai.vakhsha.nl and then exporting the resulting certificate as a PFX file that we can upload to the Application Gateway listener later.
After issuing the certificate, we can move to the configuration Tab of the Application Gateway ,where we define the routing rules, listeners, and backend settings that control how the gateway processes incoming requests and forwards them to our Container Apps. The following screenshots show the key sections of the Application Gateway configuration on one single page. If the quality of the image is not good enough, you can right-click and open it in a new tab to see the details more clearly.
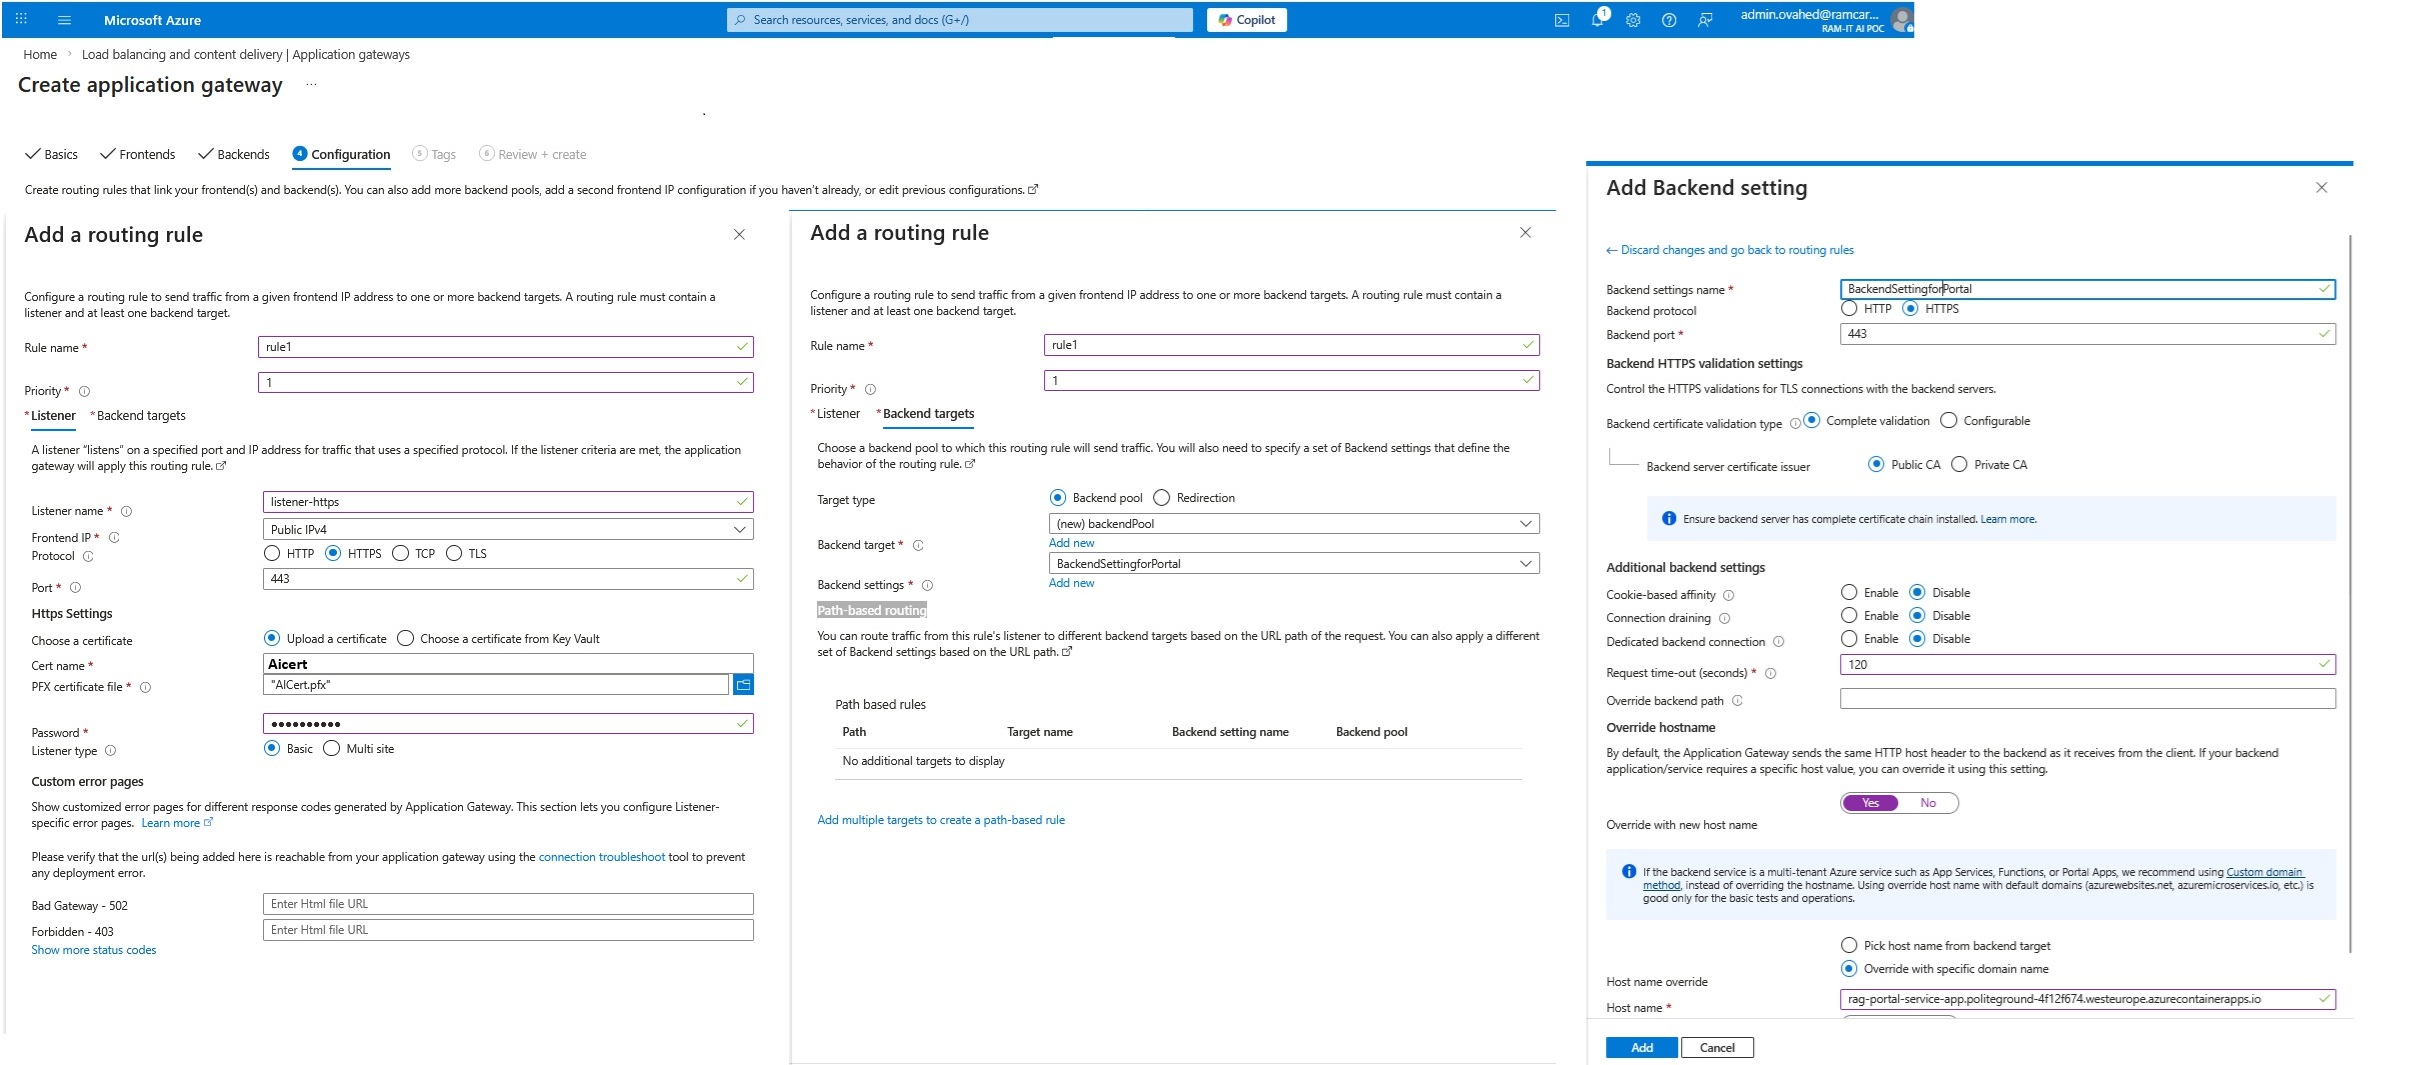
1- Routing rule — Listerner Section
In the routing rule section, we connect the listener to a destination. This rule is Basic (not path-based), meaning it routes traffic based on the listener match (host + port + protocol) rather than URL paths like /api or /health. We assign a priority so the gateway knows which rule to evaluate first when multiple rules exist.
Technically, the routing rule is the glue that ties together:
- Listener (incoming traffic conditions)
- Backend pool (where traffic should go)
- Backend settings (how the gateway should talk to the backend)
In the Listener section under the Routing rule creation section , we define how the Application Gateway should accept inbound requests. We bind the listener to the public IPv4 frontend IP and set the protocol to HTTPS on port 443, so the gateway becomes the single secure entry point from the internet.
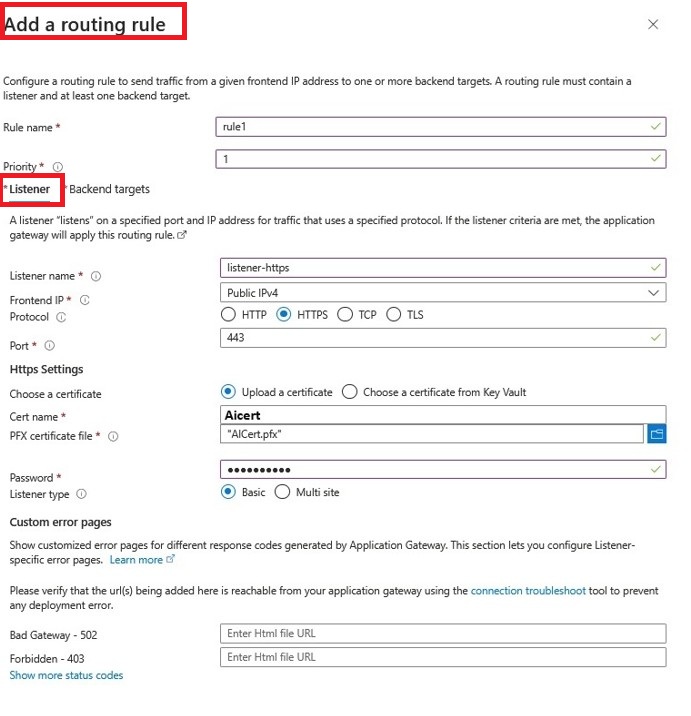
We upload a PFX certificate here and enable SNI. This allows the same public IP and port to host multiple HTTPS sites using different hostnames (for example, ai.vakhsha.nl and agent.vakhsha.nl).
In short: the listener is the front door.
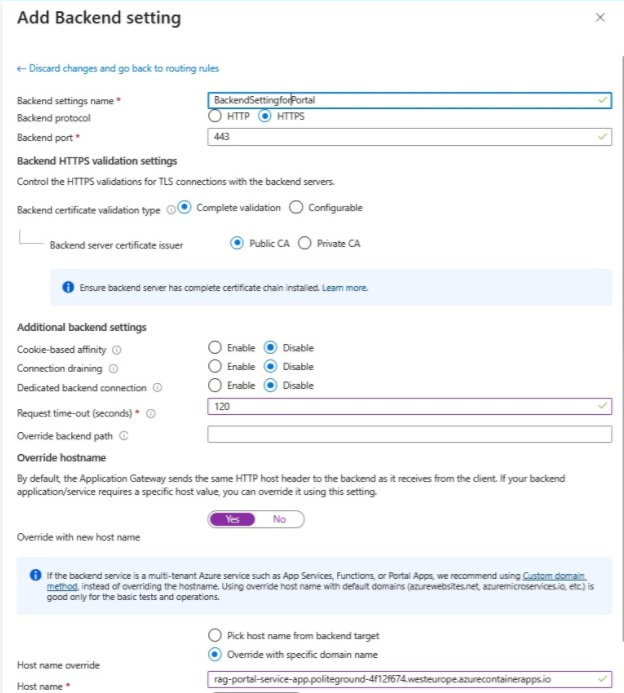
2-Routing rule — Backend Target
Backend Target is where we define the destination for incoming requests that match the listener conditions. In our case, the backend target is the application hosted in CAE. We select the backend pool that points to our CAE FQDN and configure backend settings to ensure proper communication between the gateway and the container apps.
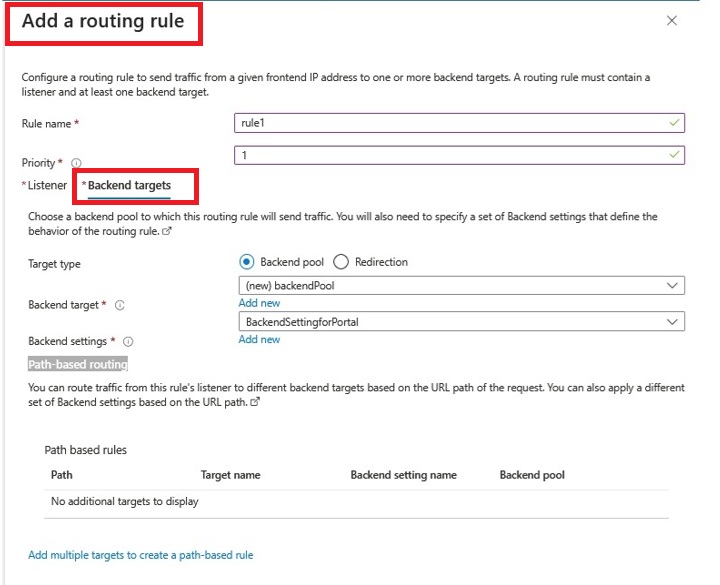
One of the most important section here is Backend settings. This is where we define how the gateway should talk to our backend. In backend settings, we define how the gateway talks to our backend. Because Container Apps endpoints are HTTPS, we set Backend protocol = HTTPS and Backend port = 443. We also keep cookie-based affinity disabled, so the gateway can distribute requests normally.
The most critical piece here is Override hostname.
Azure Container Apps expects requests to arrive with the correct Host header (its own FQDN). Since the client is calling our custom domain (ai.vakhsha.nl), we override the host header so the gateway forwards requests using the Container App FQDN. This ensures TLS and routing on the backend side work correctly.
Finally, the request timeout is increased (for example, 120 seconds) to accommodate slower requests typical in AI/RAG scenarios, preventing the gateway from cutting off long-running calls too early.
Now the Application Gateway configuration is complete and we need to wait for deployment to get finished. Once it is provisioned, we can verify that the container apps configured as backends are reachable by checking their status in the Health probes section as follows:
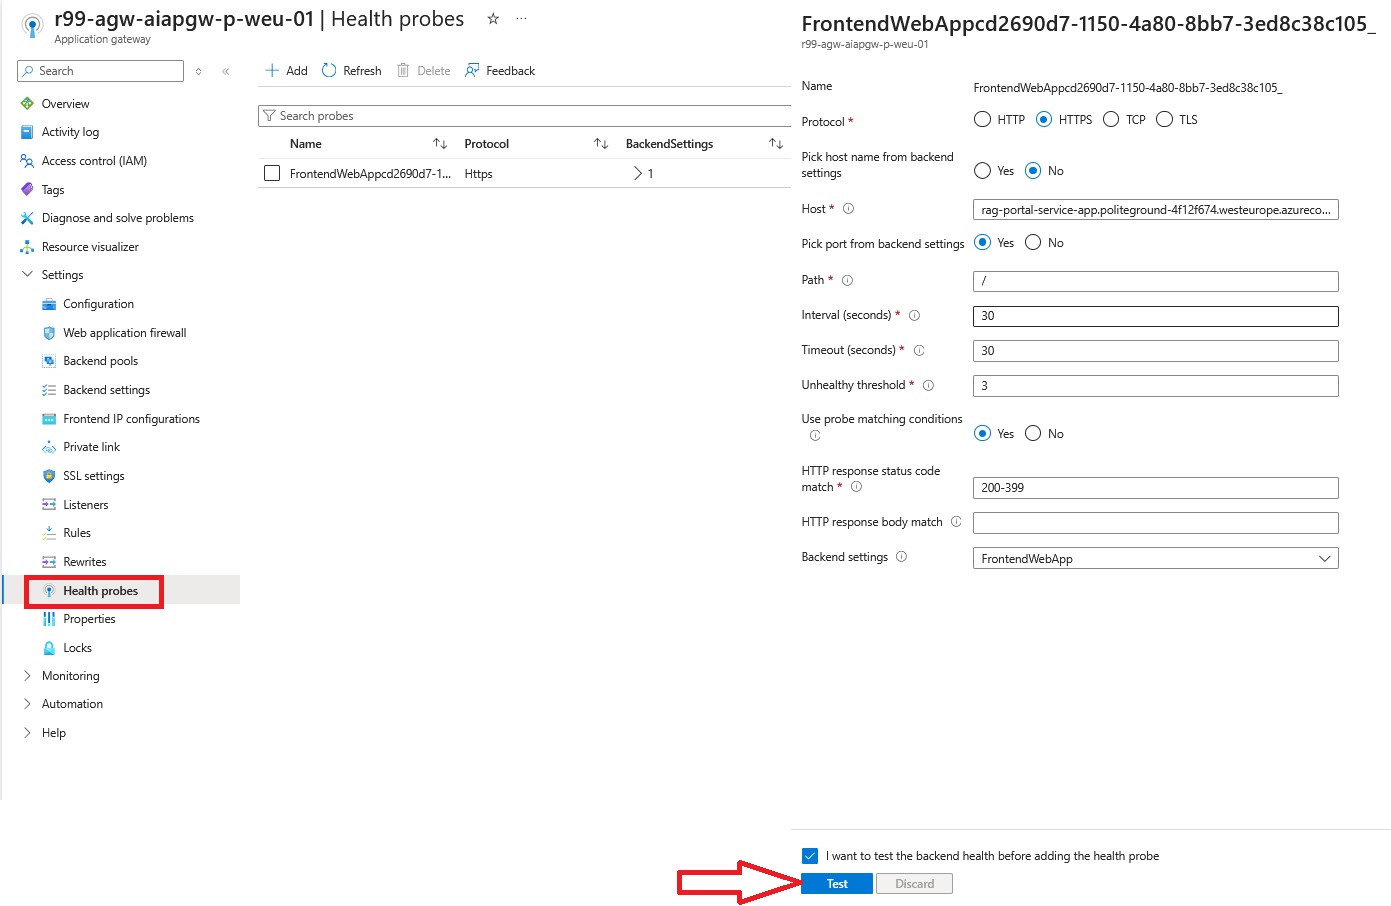
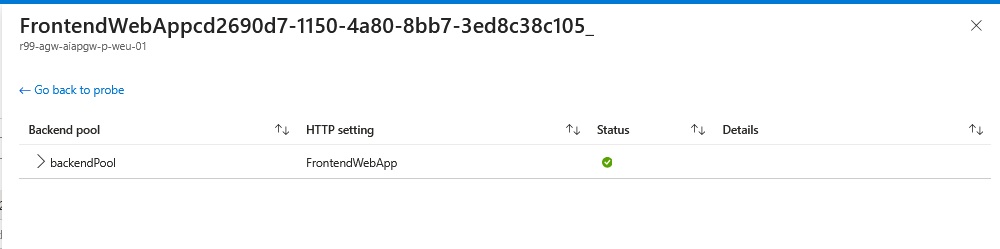
Here we can see that the backend is healthy, which means the Application Gateway can successfully reach the Container Apps Environment using the private IP and FQDN, and the override hostname setting is working correctly to ensure proper routing and TLS communication. If there were any issues with connectivity or hostname resolution, we would see unhealthy status here, which would require troubleshooting the backend pool configuration, DNS resolution, or network connectivity between the gateway and CAE.
Next step is configuring Application Gateway diagnostic settings and creating a Log Analytics workspace so we can see the traffic logs.
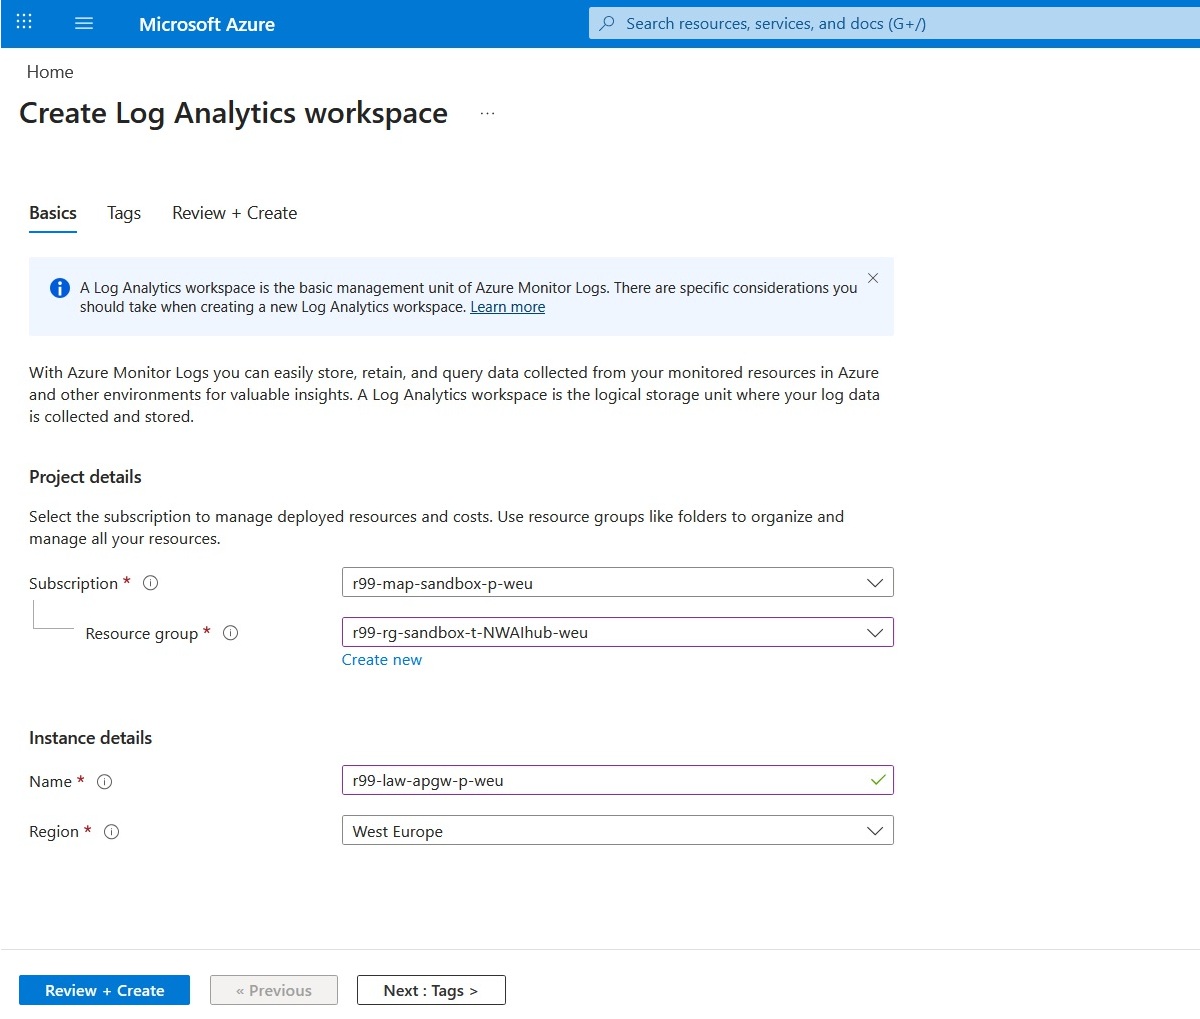
Creating a Log Analytics workspace is straightforward. One nice benefit: a single workspace can collect logs for resources across different resource groups and even subscriptions. Let’s create a new workspace and call it AppGateway-Logs:
Next move is to attach the created log workspace and configure diagnostic settings on the Application Gateway.
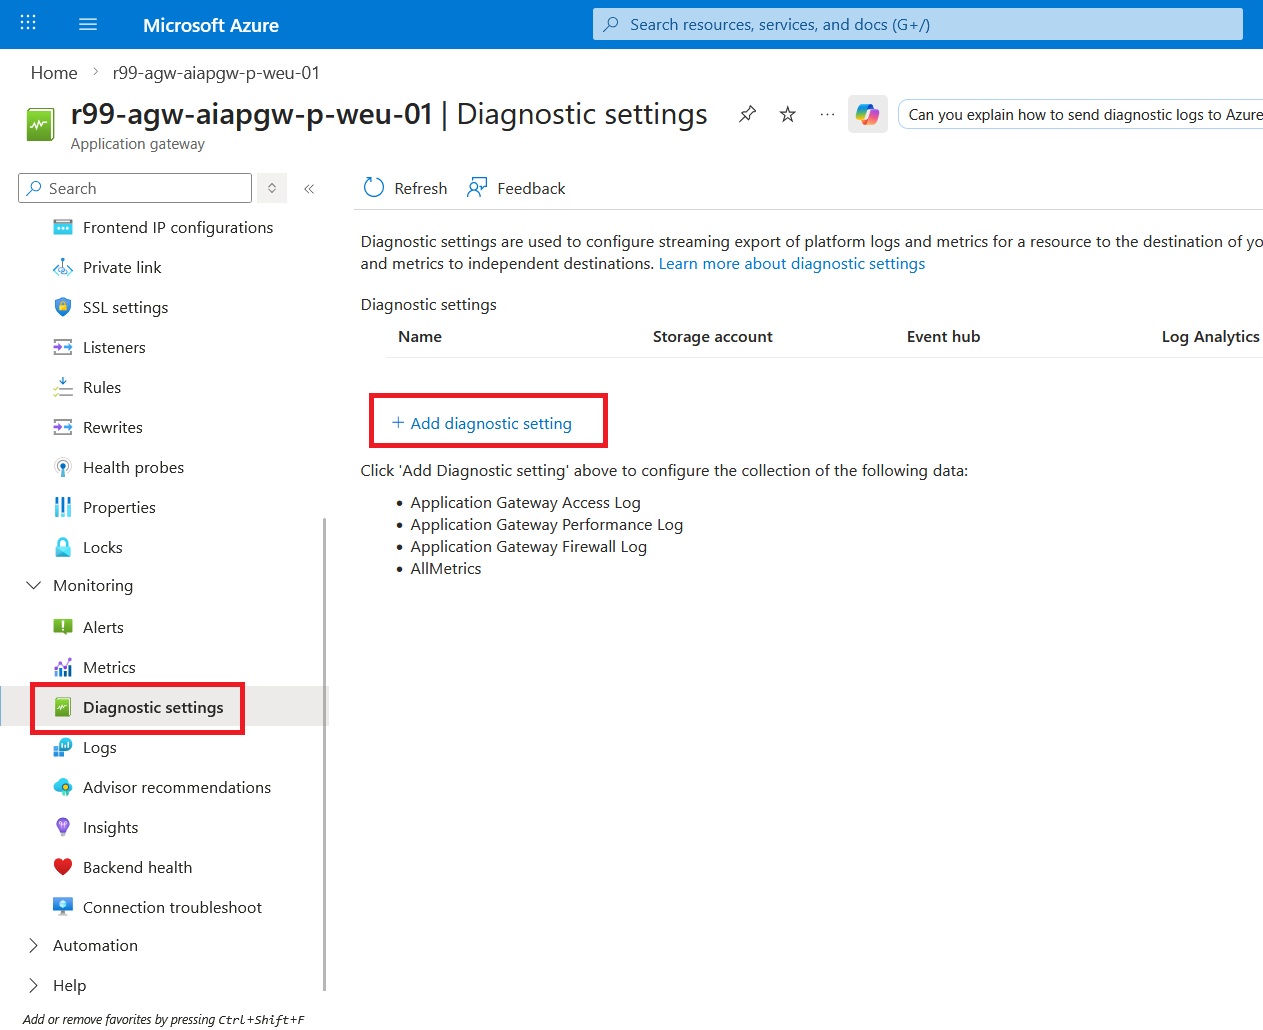
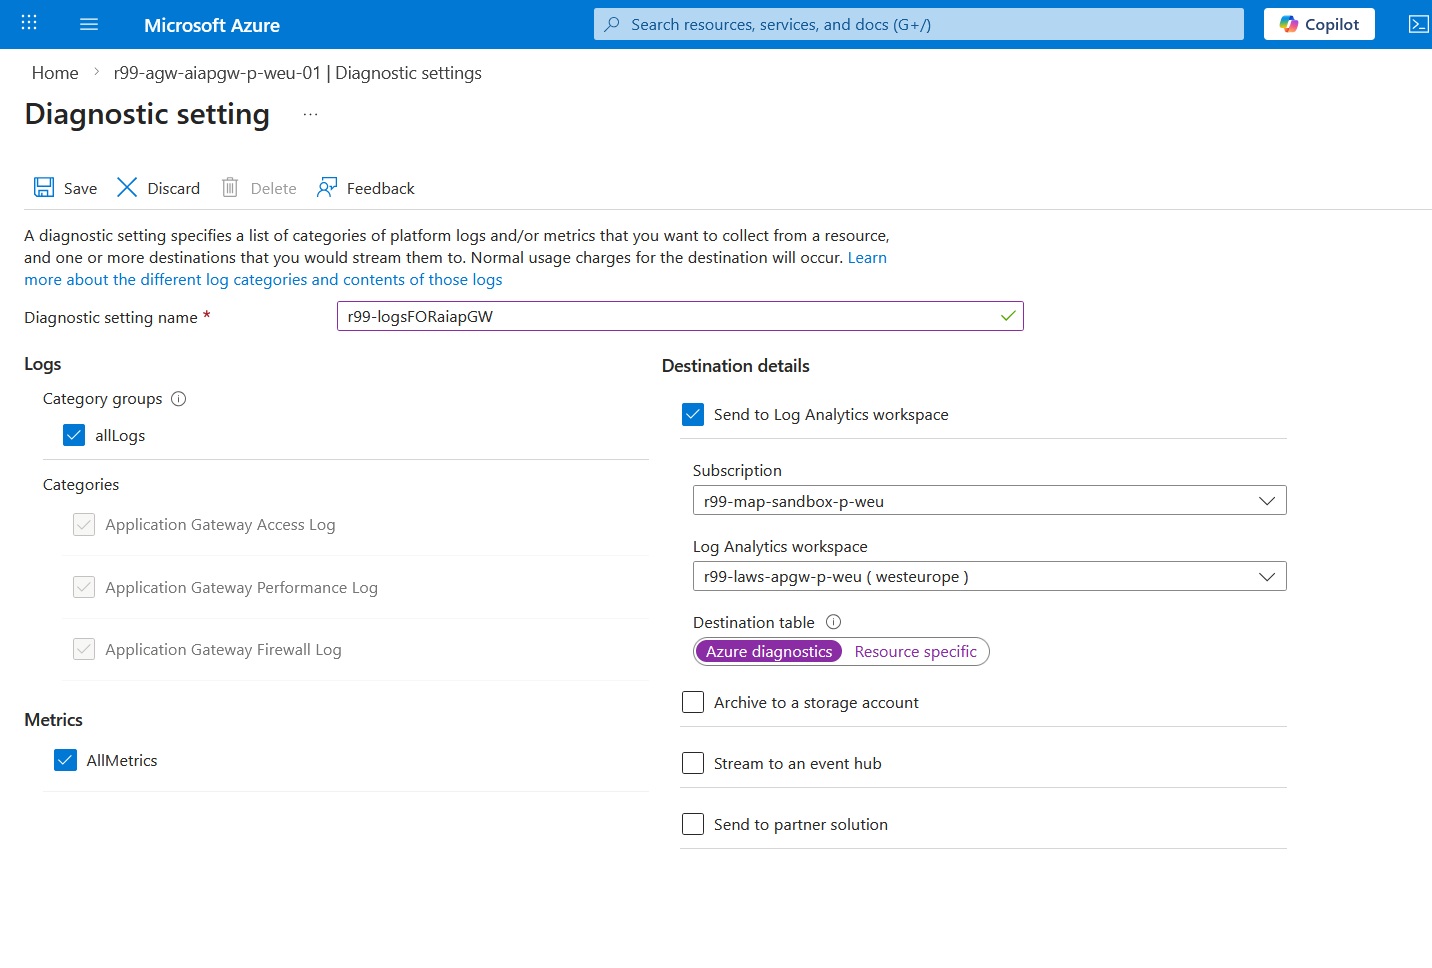
Here I enabled diagnostic settings on the Application Gateway to capture logs and metrics and send them to Log Analytics. This gives us a single place to troubleshoot traffic (access, WAF, performance) and build queries, dashboards, and alerts.
This option controls where the logs land:
- AzureDiagnostics: sends logs to the shared AzureDiagnostics table (legacy format)
- Resource specific: sends logs to dedicated tables per resource type (cleaner schema and usually better for new setups)
We are almost done and ready to see incoming traffic logs. Let’s test whether we can access the published container app, which is an AI chatbot via ai.vakhsha.nl:
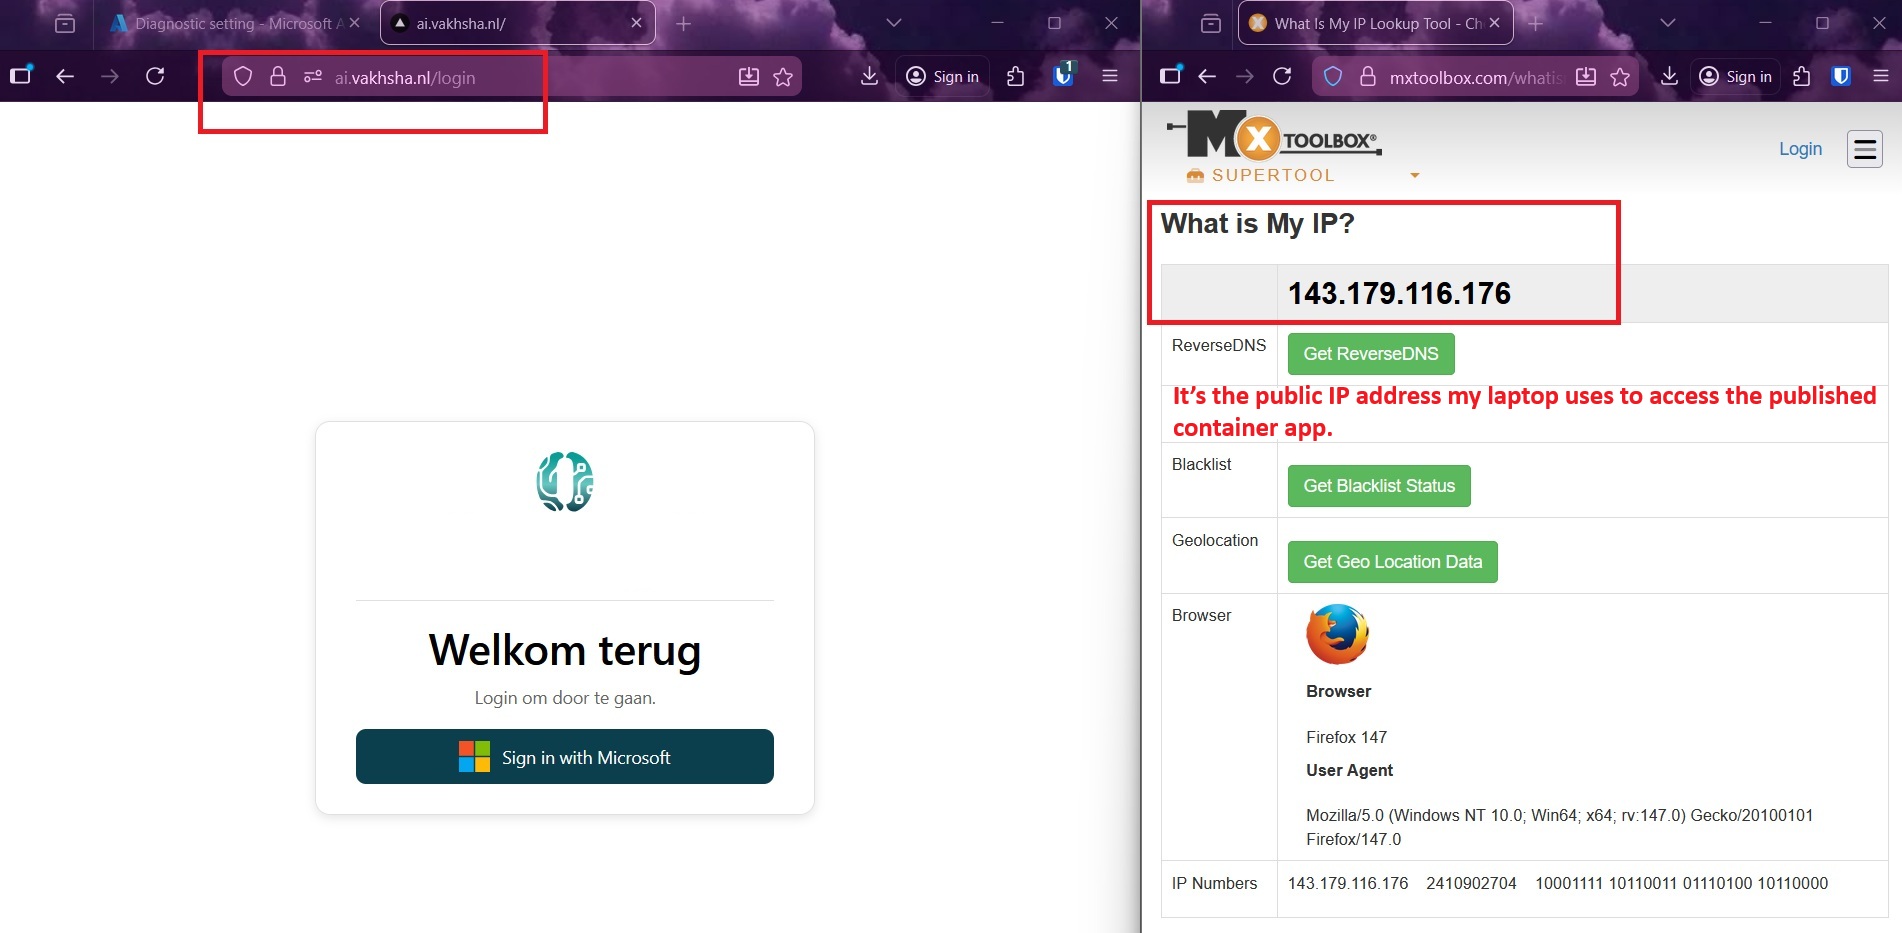
The good news is the Application Gateway works seamlessly and we can access the published service.
Next, let’s check the traffic flow logs and see whether we can find the public IP address of the client in the collected logs.
You can use the following customized KQL query to extract Application Gateway access logs:
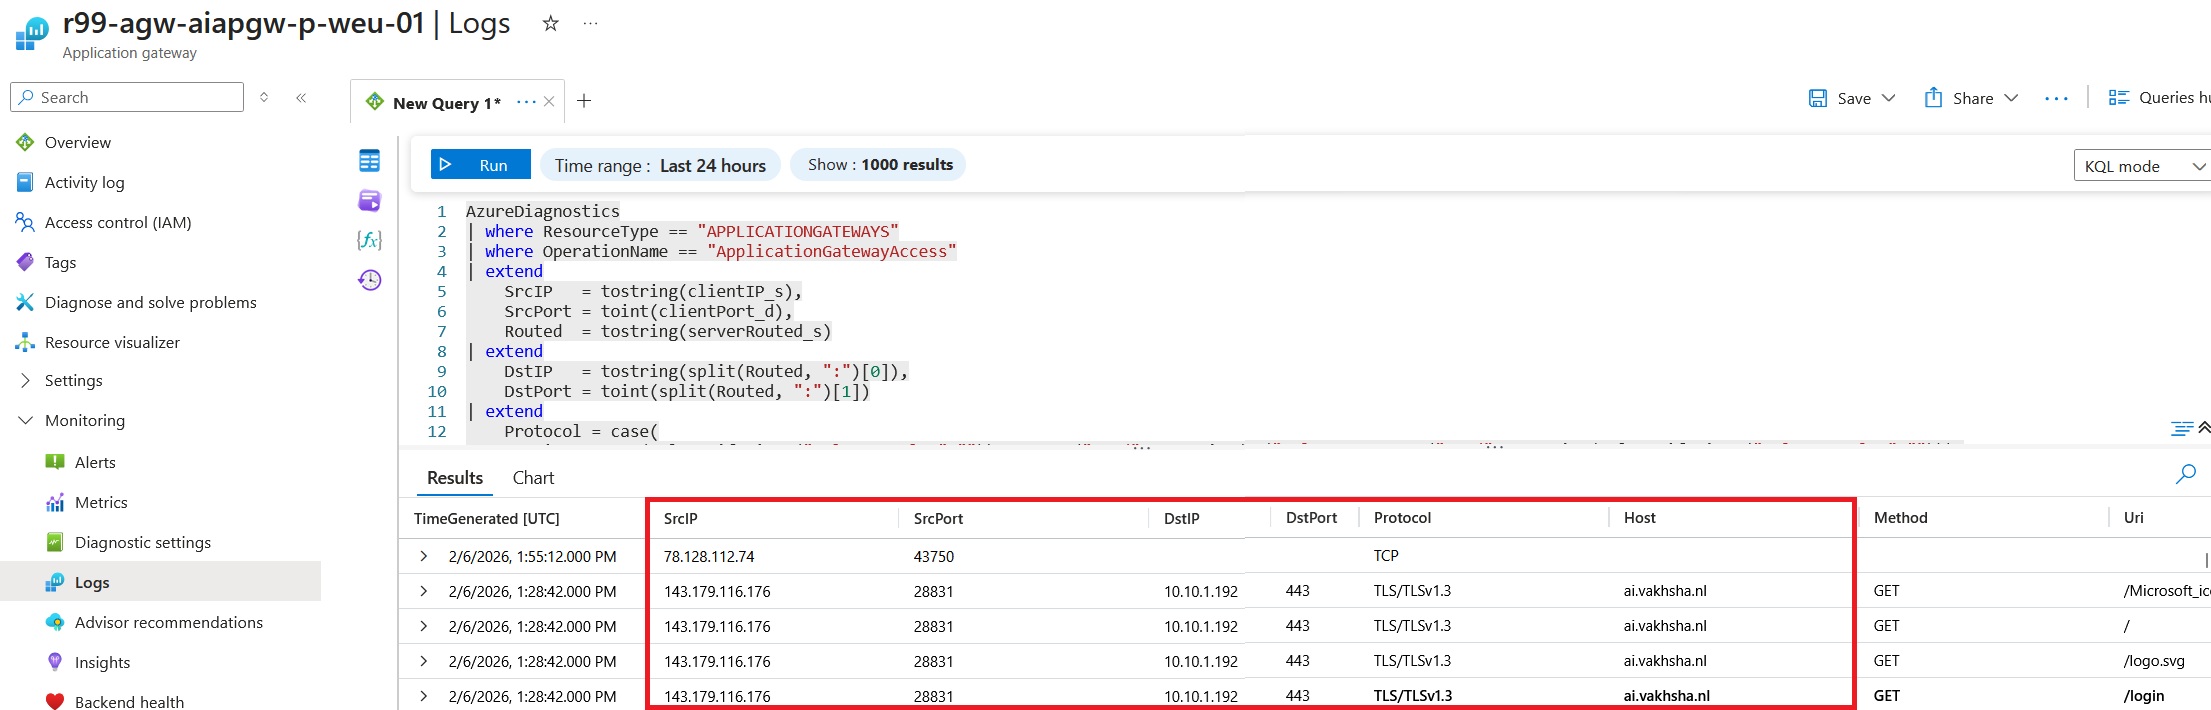
This KQL pulls Application Gateway access logs and outputs one simple “tuple” per request: when it happened, who called it (source IP/port), where it was routed (destination IP/port), the host/URL/method, the status code, TLS version, and how long it took. It’s an easy way to see traffic and performance at a glance.
AzureDiagnostics
          | where ResourceType == "APPLICATIONGATEWAYS"
          | where OperationName == "ApplicationGatewayAccess"
          | extend
              SrcIP   = tostring(clientIP_s),
              SrcPort = toint(clientPort_d),
              Routed  = tostring(serverRouted_s)
          | extend
              DstIP   = tostring(split(Routed, ":")[0]),
              DstPort = toint(split(Routed, ":")[1])
          | project
              TimeGenerated,
              SrcIP, SrcPort,
              DstIP, DstPort,
              Host    = tostring(coalesce(column_ifexists("originalHost_s",""), column_ifexists("host_s",""))),
              Method  = tostring(column_ifexists("httpMethod_s","")),
              Uri     = tostring(column_ifexists("requestUri_s","")),
              Status  = toint(column_ifexists("httpStatus_d", long(null))),
              Tls     = tostring(column_ifexists("sslProtocol_s","")),
              TimeTakenMs = todouble(column_ifexists("timeTaken_d", real(null)))
          | order by TimeGenerated desc
Eventually, It's time to check the WAF logs as the WAF funtionality is one of the main reasons we choose Application Gateway. The WAF logs are a goldmine for understanding attack patterns, client behavior, and potential vulnerabilities. By analyzing these logs, you can identify which IPs are probing your applications, what kinds of requests are triggering detections, and which WAF rules are most commonly matched.
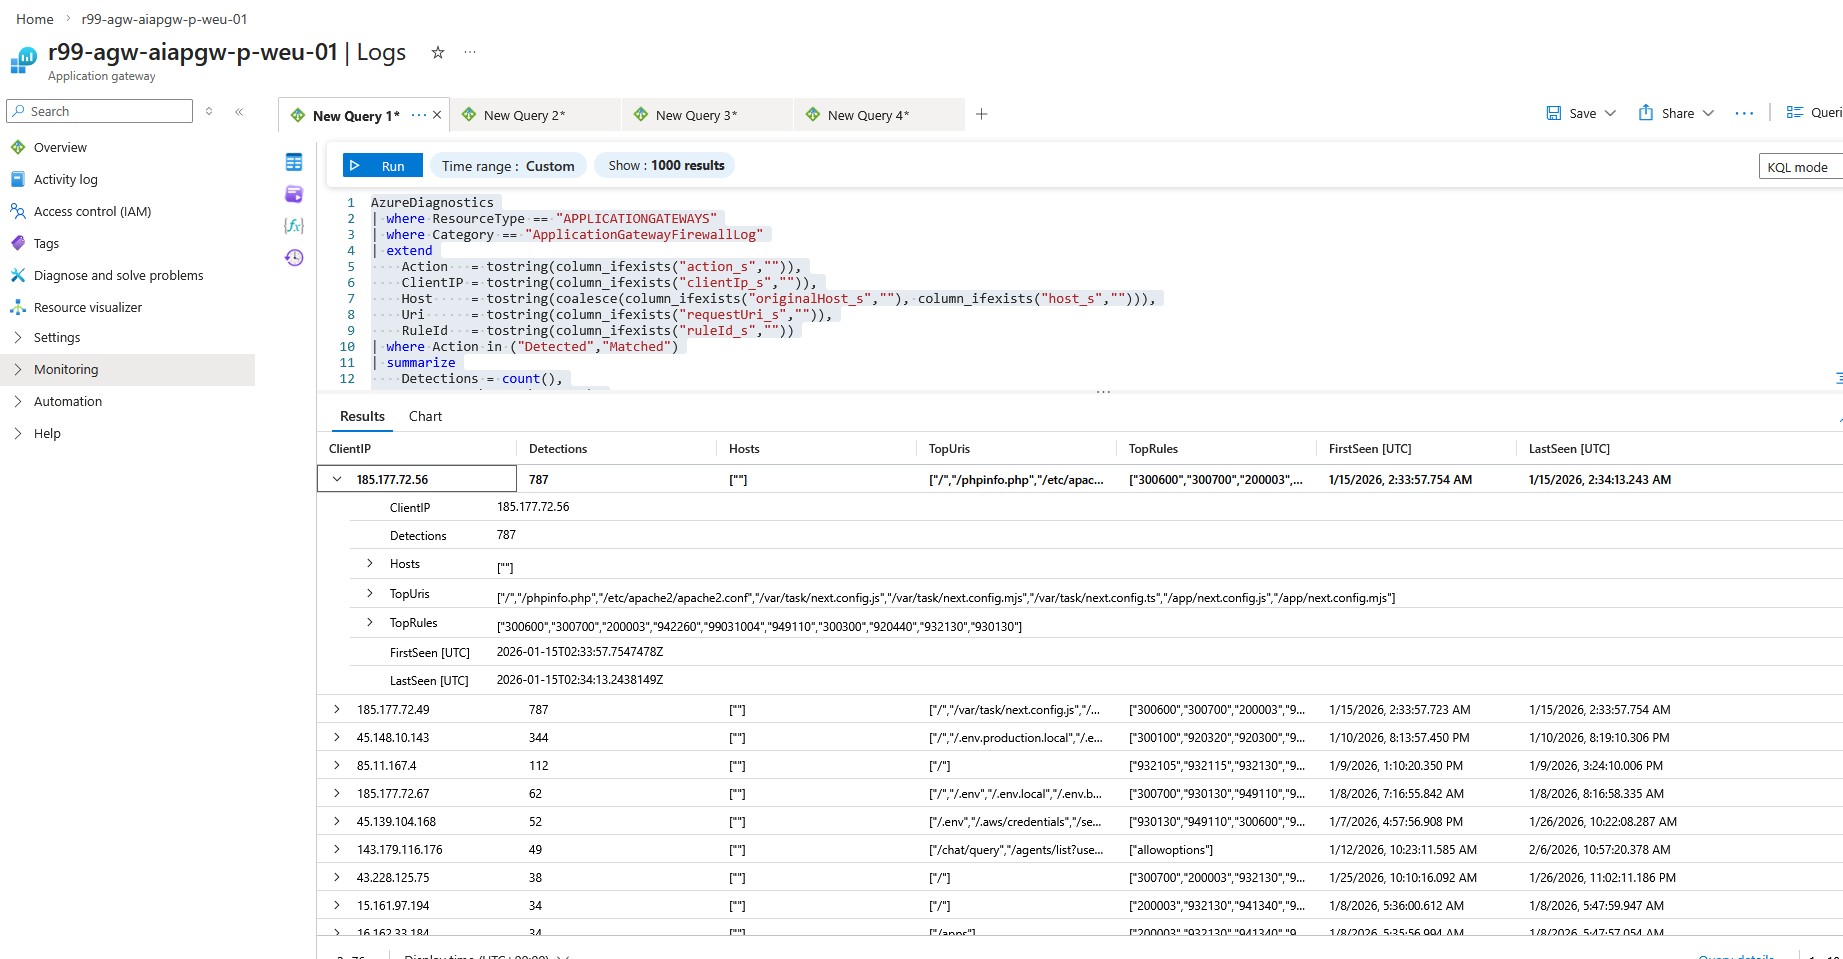
We use the following KQL query to list the top 50 client IPs triggering WAF detections on the Application Gateway:
AzureDiagnostics
          | where ResourceType == "APPLICATIONGATEWAYS"
          | where Category == "ApplicationGatewayFirewallLog"
          | extend
              Action   = tostring(column_ifexists("action_s","")),
              ClientIP = tostring(column_ifexists("clientIp_s","")),
              Host     = tostring(coalesce(column_ifexists("originalHost_s",""), column_ifexists("host_s",""))),
              Uri      = tostring(column_ifexists("requestUri_s","")),
              RuleId   = tostring(column_ifexists("ruleId_s",""))
          | where Action in ("Detected","Matched")
          | summarize
              Detections = count(),
              Hosts = make_set(Host, 5),
              TopUris = make_set(Uri, 8),
              TopRules = make_set(RuleId, 10),
              FirstSeen=min(TimeGenerated),
              LastSeen=max(TimeGenerated)
            by ClientIP
          | order by Detections desc
          | take 50
Lastly let's see What the WAF log output shows:
For the top IP, you’ll often see automated scans looking for sensitive files and common app/framework pages (like .env or phpinfo). This usually indicates an internet bot probing your site, not normal user traffic.
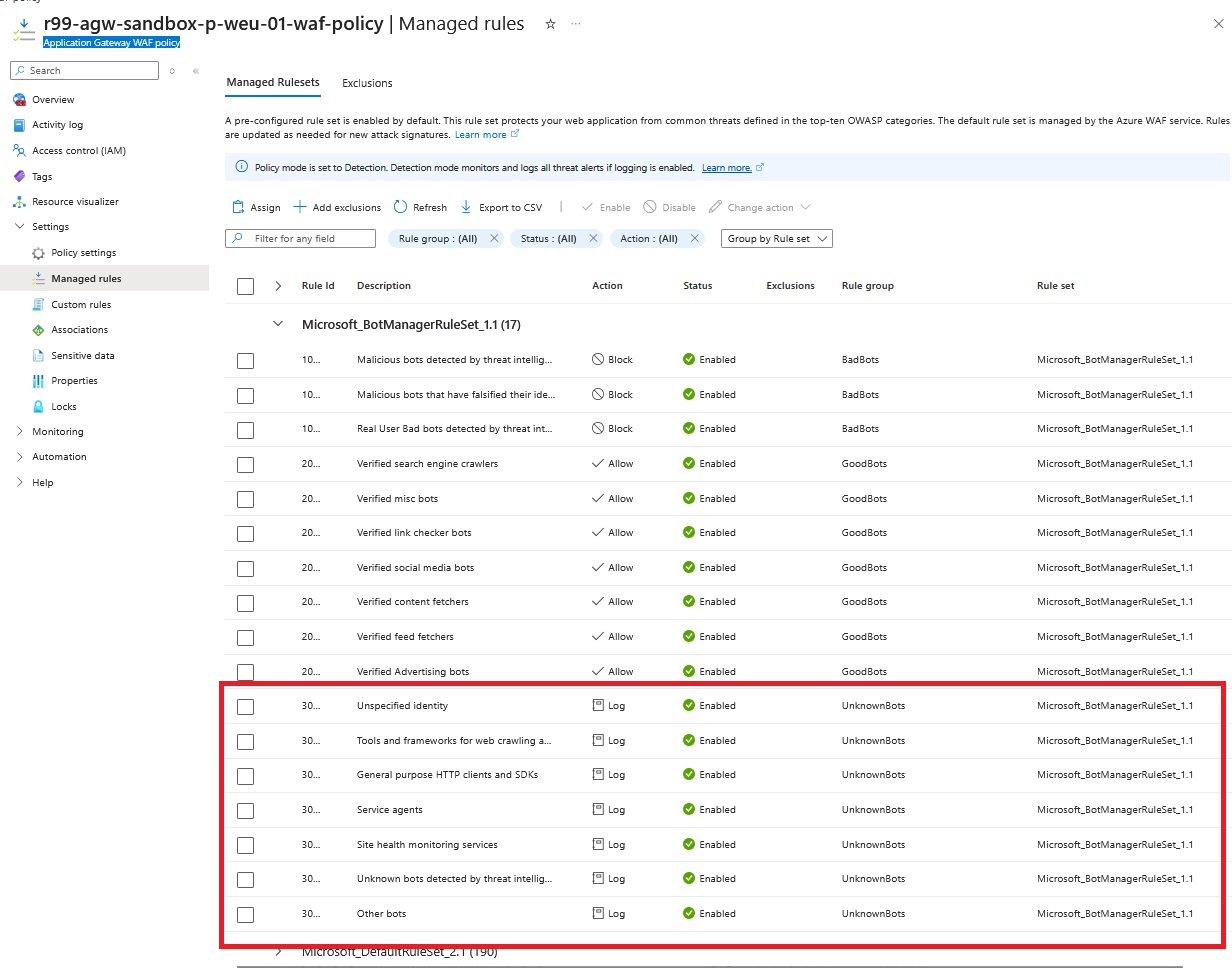
Why you might not see the word Blocked:
As shown in the following WAF policy associated with the Application Gateway, it’s currently set to Detection mode (monitor and log) rather than Prevention mode (actively block requests). This is a common practice during the initial deployment phase, allowing you to observe and analyze traffic patterns and potential false positives without impacting legitimate users. Once you are confident that the WAF rules are correctly tuned and not blocking valid traffic, you can switch to Prevention mode to enable active protection against detected threats.
SUMMARY
In this series of articles, we successfully published a private Azure Container Apps environment through an Application Gateway with WAF enabled. We configured a Private DNS zone to enable hostname resolution for the CAE, set up the Application Gateway with proper routing and SSL termination, and then analyzed incoming traffic and WAF logs using Log Analytics. This setup provides a secure and scalable way to expose containerized applications to the internet while maintaining control over traffic and gaining insights through logging and monitoring.
As the managment access to all critical resources like PostgreSQL database, Azure Storage, and Container Registry is only private, in future posts, we will explore how to integrate Azure VPN gateway for secure remote access to the Container Apps environment and other resources using Azure DNS private resolver.